
How to Fix VAN: STATUS_SB_POLICY (Secure Boot Policy) – 2026
VAN: STATUS_SB_POLICY means Secure Boot is on, but Vanguard cannot verify its policy, usually because the Secure Boot keys were changed, cleared or replaced with custom keys. Restart into the BIOS, reset Secure Boot to the factory default keys, install every Windows update for the 2023 certificates, and restart.
VAN: STATUS_SB_POLICY
What causes VAN: STATUS_SB_POLICY
Secure Boot works with a chain of keys stored in the firmware. Vanguard expects the standard Microsoft keys. The check fails when the keys were cleared (Setup Mode), replaced by custom keys (common after installing Linux with your own keys), or are out of date while Microsoft rolls out new Secure Boot certificates in 2026.
How to fix VAN: STATUS_SB_POLICY in Windows
Suspend BitLocker first (if it is on)
manage-bde -protectors -disable C: -RebootCount 2. It turns itself back on after two restarts. Check that you can see your recovery key at aka.ms/myrecoverykey before you go on.Install the Secure Boot certificate updates
How to fix it in the BIOS
This part happens in your PC's firmware setup (the BIOS), so open this page on your phone first. Menu names change a little between BIOS versions: if a path below does not match, look for the words in bold.
Restart into the BIOS
shutdown /r /fw /t 0 in Terminal (Admin). You can also press Del right after switching the PC on (desktops; F2 on many laptops and some ASRock and MSI boards).Update the BIOS
Change these settings
- Turn on Secure Boot and install the default keys (Install default Secure Boot keys or Restore Factory Keys). Secure Boot mode Standard, OS type Windows UEFI mode.
Where to find them on your board:
ASUS
Secure Boot: Boot > Secure Boot > OS Type: Windows UEFI mode, then Key Management > Install Default Secure Boot keys
MSI
Secure Boot: Settings > Advanced > Windows OS Configuration > Secure Boot: Enabled, Secure Boot Mode: Standard
Gigabyte (AORUS)
Secure Boot: Boot > Secure Boot: Enabled, Secure Boot Mode: Standard (or Restore Factory Keys)
ASRock
Secure Boot: Security > Secure Boot: Enabled, then Install Default Secure Boot Keys
Laptops and prebuilt PCs
HP: Esc then F10, Advanced > Secure Boot Configuration, Security > TPM Embedded Security, Advanced > System Options > Virtualization Technology.
Lenovo: F1 on ThinkPad, F2 or the Novo button on IdeaPad and Legion, Security > Secure Boot, Security > Security Chip, Security > Virtualization.
ASUS: F2, Security > Secure Boot Control, Advanced > Trusted Computing.
Acer: F2, set a Supervisor password first or Secure Boot stays greyed out, then Boot > Secure Boot and Security > TPM.
MSI: Del, Security > Secure Boot, Advanced > Trusted Computing.
Gigabyte / AORUS: F2, Security > Secure Boot, Advanced > Trusted Computing.
Save and restart
Fix it in one click with RIP Tweaks (free)
RIP Tweaks 6.9.3 has a free anti-cheat error fixer. Open Fixes, then Anti-cheat errors, and paste VAN: STATUS_SB_POLICY or pick your game. The app first checks what your PC has right now (for example Secure Boot: Off, TPM: On) and shows only the steps still missing.
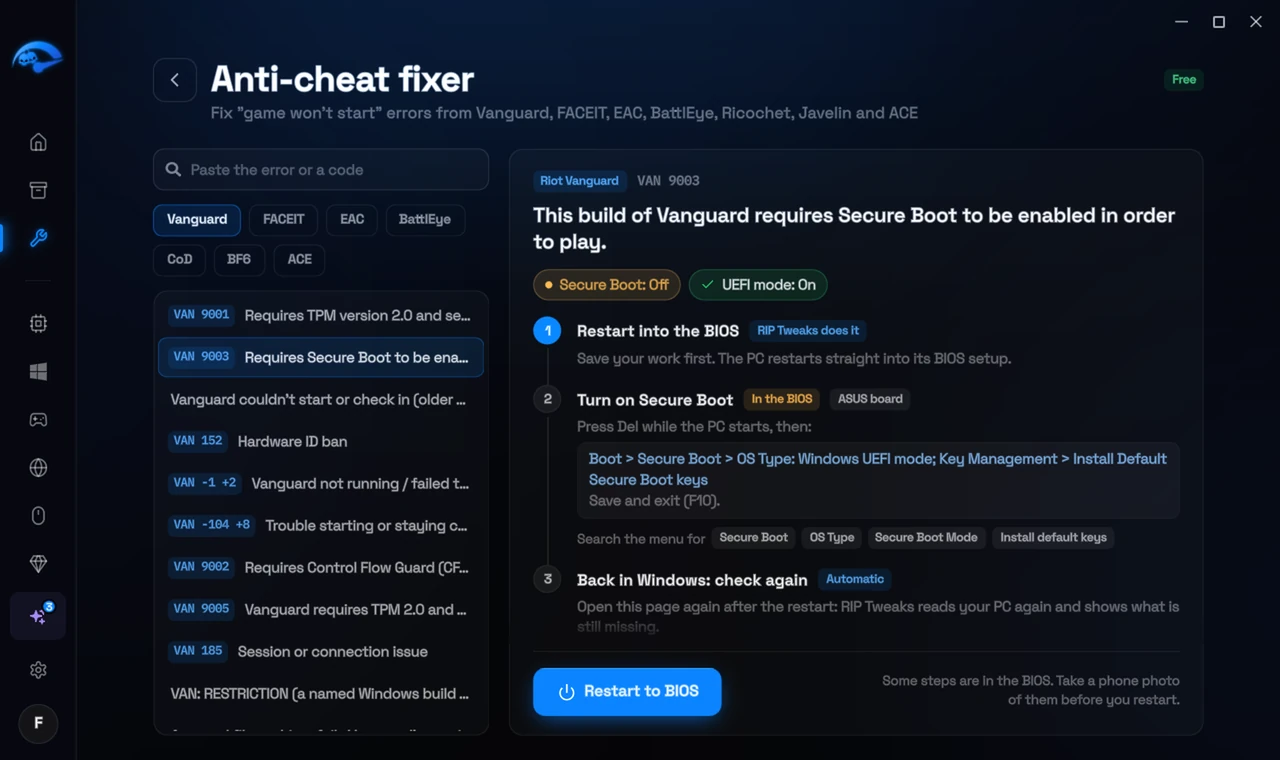
It fixes the Windows side itself
It takes you into the BIOS with the right card
It checks again after the restart
The fixer is free in every plan, also without an account. Download RIP Tweaks (free)
Check that it worked
In msinfo32, Secure Boot State says On. Start the Riot Client.
Frequently asked questions
I use custom Secure Boot keys for Linux. Can I keep them?
Vanguard expects the factory keys. Restoring them is the reliable fix; most big Linux distributions boot with the default keys through Microsoft's signed shim.
What are the 2023 Secure Boot certificates?
Microsoft's original Secure Boot certificates from 2011 expire in 2026. Windows Update installs the new 2023 ones, and some boards also need a BIOS update for them.
Is it safe to turn on Secure Boot?
Yes. Secure Boot is a standard UEFI feature that only lets signed boot software start. Windows 11 PCs ship with it on, and turning it on does not touch your files, games or settings.
Will Secure Boot break my Linux dual boot?
Most big Linux distributions (Ubuntu, Fedora, openSUSE) boot fine with Secure Boot on. Custom kernels or unsigned drivers may not. Keep Windows Boot Manager first in the boot order so Windows starts directly.
My settings were gone after a BIOS update. Is that normal?
Yes. BIOS updates often reset every setting to the default, and on some boards that turns fTPM, Secure Boot or virtualization off again. Check them again after every BIOS update.
Sources
- Riot Support: Vanguard error codes (updated 22 May 2026)
- Microsoft: Windows Secure Boot certificate expiration (KB5062710) (June 2025)
All anti-cheat errors: Anti-Cheat Error Fixes. Related: How to Fix VAN: RESTRICTION 1, 3, 4 and 5 in Valorant – 2026 and How to Fix VAN 9003 in Valorant (Secure Boot) – 2026.