
How to Fix VAN 9005 in Valorant (VBS, TPM 2.0 and UEFI) – 2026
VAN 9005 means Riot Vanguard wants Virtualization-based Security (VBS) running on your PC, and VBS cannot start because TPM 2.0, UEFI boot, CPU virtualization or the Windows hypervisor is missing. Fix it by turning on TPM, Secure Boot and virtualization in the BIOS, then Memory integrity in Windows Security. After one restart VBS runs and Valorant starts.
VAN 9005
What causes VAN 9005
VBS is a Windows feature that uses the CPU's virtualization to protect the kernel. Riot asks for it on some PCs. It only runs when all of these are true:
- the PC starts in UEFI mode with a TPM 2.0 and Secure Boot,
- CPU virtualization (SVM on AMD, VT-x on Intel) is on in the BIOS,
- the Windows hypervisor is allowed to start (tweak tools often set
hypervisorlaunchtype off), - Memory integrity or VBS is turned on in Windows.
How to fix VAN 9005 in Windows
Used RIP Tweaks before? Turn our Windows tweaks off first
Check your TPM
tpm.msc and press Enter. The TPM is ready for use with Specification Version 2.0 is what you want. Compatible TPM cannot be found means the firmware TPM is switched off in the BIOS. Almost every AMD Ryzen CPU (fTPM) and Intel CPU of the last years (PTT) has one built in.Check that virtualization is on
Suspend BitLocker first (if it is on)
manage-bde -protectors -disable C: -RebootCount 2. It turns itself back on after two restarts. Check that you can see your recovery key at aka.ms/myrecoverykey before you go on.Let the Windows hypervisor start
bcdedit /set hypervisorlaunchtype auto and restart.Turn on Memory integrity
Check that VBS is running
msinfo32 again. Virtualization-based security should say Running. If it says Enabled but not running, virtualization is off in the BIOS (SVM on AMD, Intel Virtualization Technology on Intel) or the hypervisor is not allowed to start (step above). Turning on Memory integrity turns VBS on by itself.How to fix it in the BIOS
This part happens in your PC's firmware setup (the BIOS), so open this page on your phone first. Menu names change a little between BIOS versions: if a path below does not match, look for the words in bold.
Restart into the BIOS
shutdown /r /fw /t 0 in Terminal (Admin). You can also press Del right after switching the PC on (desktops; F2 on many laptops and some ASRock and MSI boards).Change these settings
- Turn on the firmware TPM: AMD fTPM (often Firmware TPM) on AMD, Intel PTT (Platform Trust Technology) on Intel.
- Turn on Secure Boot and install the default keys (Install default Secure Boot keys or Restore Factory Keys). Secure Boot mode Standard, OS type Windows UEFI mode.
- Turn on CPU virtualization: SVM Mode on AMD, Intel Virtualization Technology (VT-x) on Intel.
Where to find them on your board:
ASUS
TPM 2.0 (AMD fTPM / Intel PTT): Advanced > AMD fTPM configuration > Firmware TPM (AMD), or Advanced > PCH-FW Configuration > PTT (Intel)
Secure Boot: Boot > Secure Boot > OS Type: Windows UEFI mode, then Key Management > Install Default Secure Boot keys
CPU virtualization (SVM / VT-x): Advanced > CPU Configuration > SVM Mode (AMD) or Intel Virtualization Technology (Intel)
MSI
TPM 2.0 (AMD fTPM / Intel PTT): Settings > Security > Trusted Computing > Security Device Support: Enable, then AMD CPU fTPM or Intel PTT
Secure Boot: Settings > Advanced > Windows OS Configuration > Secure Boot: Enabled, Secure Boot Mode: Standard
CPU virtualization (SVM / VT-x): OC > Advanced CPU Configuration > SVM Mode (AMD) or Intel Virtualization Tech (Intel)
Gigabyte (AORUS)
TPM 2.0 (AMD fTPM / Intel PTT): Settings > Miscellaneous > AMD CPU fTPM (AMD) or Intel Platform Trust Technology (PTT) (Intel)
Secure Boot: Boot > Secure Boot: Enabled, Secure Boot Mode: Standard (or Restore Factory Keys)
CPU virtualization (SVM / VT-x): Tweaker > Advanced CPU Settings > SVM Mode (AMD) or Intel Virtualization Technology (Intel)
ASRock
TPM 2.0 (AMD fTPM / Intel PTT): Advanced > CPU Configuration > AMD fTPM switch (AMD), or Security > Intel Platform Trust Technology (Intel)
Secure Boot: Security > Secure Boot: Enabled, then Install Default Secure Boot Keys
CPU virtualization (SVM / VT-x): Advanced > CPU Configuration > SVM Mode (AMD) or Intel Virtualization Technology (Intel)
Laptops and prebuilt PCs
HP: Esc then F10, Advanced > Secure Boot Configuration, Security > TPM Embedded Security, Advanced > System Options > Virtualization Technology.
Lenovo: F1 on ThinkPad, F2 or the Novo button on IdeaPad and Legion, Security > Secure Boot, Security > Security Chip, Security > Virtualization.
ASUS: F2, Security > Secure Boot Control, Advanced > Trusted Computing.
Acer: F2, set a Supervisor password first or Secure Boot stays greyed out, then Boot > Secure Boot and Security > TPM.
MSI: Del, Security > Secure Boot, Advanced > Trusted Computing.
Gigabyte / AORUS: F2, Security > Secure Boot, Advanced > Trusted Computing.
Save and restart
Fix it in one click with RIP Tweaks (free)
RIP Tweaks 6.9.3 has a free anti-cheat error fixer. Open Fixes, then Anti-cheat errors, and paste VAN 9005 or pick your game. The app first checks what your PC has right now (for example Secure Boot: Off, TPM: On) and shows only the steps still missing.
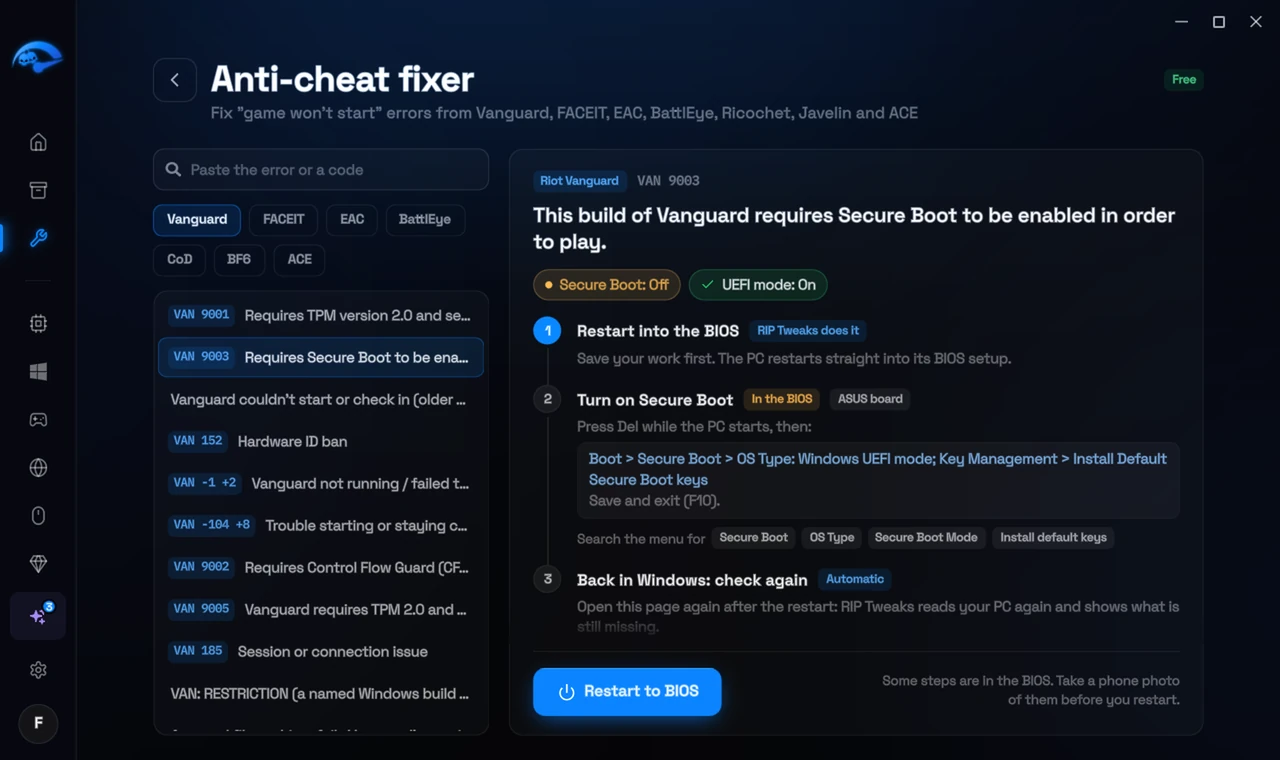
It fixes the Windows side itself
It takes you into the BIOS with the right card
It checks again after the restart
The fixer is free in every plan, also without an account. Download RIP Tweaks (free)
Check that it worked
Open msinfo32: Virtualization-based security must say Running, and Virtualization-based security Services Running should list Hypervisor enforced Code Integrity. Then start the Riot Client.
Frequently asked questions
What is the difference between VAN 9005 and VAN 9001?
VAN 9001 only asks for TPM 2.0 and Secure Boot. VAN 9005 asks for VBS on top, which also needs CPU virtualization, the Windows hypervisor and Memory integrity.
Why does Riot ask me for VBS and not my friend?
Riot turns on extra checks for some PCs and accounts, for example when the system looks unusual. It is not a ban: once VBS runs, you can play.
Does Memory integrity lower FPS?
It can cost a little performance in some games, and Microsoft says so itself. On recent CPUs the difference is usually small. When an anti-cheat requires it, there is no way around it: it has to be on to play.
Memory integrity will not turn on. Why?
Almost always a driver Windows does not allow under Memory integrity. Click Review incompatible drivers in Core isolation, update or remove the app behind each driver, and restart. If the switch turns itself off again, the Windows hypervisor is blocked (run bcdedit /set hypervisorlaunchtype auto) or virtualization is off in the BIOS.
How do I do this on a laptop?
The same settings exist on laptops, only the key and the menus differ: F2 on most (Dell, ASUS, Acer, Lenovo IdeaPad and Legion), F1 on ThinkPads, Esc then F10 on HP. The Laptops card above lists where each maker puts Secure Boot, the TPM and virtualization.
Can changing these settings get me banned?
No. These are the anti-cheat's own requirements, and the publisher asks you to change them. Bans come from cheats and tools that tamper with the game, never from turning on Windows security features.
Sources
- Riot Support: Error VAN 9005 (updated 15 January 2026)
- Riot Support: Vanguard error codes (updated 22 May 2026)
All anti-cheat errors: Anti-Cheat Error Fixes. Related: How to Fix VAN: RESTRICTION 1, 3, 4 and 5 in Valorant – 2026 and How to Fix VAN 9001 in Valorant (TPM 2.0 and Secure Boot) – 2026.