How to Boost FPS and Lower Input Delay in Fortnite (2026 Step by Step)

Written version of our video, every step checked against it.
Quick answer
- Test your FPS first: on the PC in the video, Fortnite ran at 150 to 160 FPS looking at the sky on the lowest settings.
- Install RIP Tweaks, make a Before Tweaks backup, then work through Hardware, Windows (Win32 Priority Separation
26 Hex) and the RIP Power Plan. - Run the Basic debloat, set Cloudflare DNS and the network tweaks, and run the Bufferbloat Test to see if your ping rises under load.
- Cap uploads with the Upload Limiter, turn on the Input Lag tweaks and optimize your mouse to 1000 Hz.
- Launch Fortnite from the Balanced game mode with the FPS Boost Profile: the same spot went to around 280 FPS in the video.
This guide is for Fortnite players on Windows 10 or 11 who want more FPS, less input delay and steadier ping in one go. It follows our video click by click in the free RIP Tweaks app, on a gaming laptop with an AMD processor, an RTX 4060 Laptop GPU and 16 GB of RAM, and shows the exact option picked on every screen.
In this video
Pick one spot you can return to and read the FPS counter there. The video uses a Creative island, looks straight at the sky and plays on the lowest settings. On that PC the counter sat at 150 to 160 FPS, and it dips lower as the camera moves.
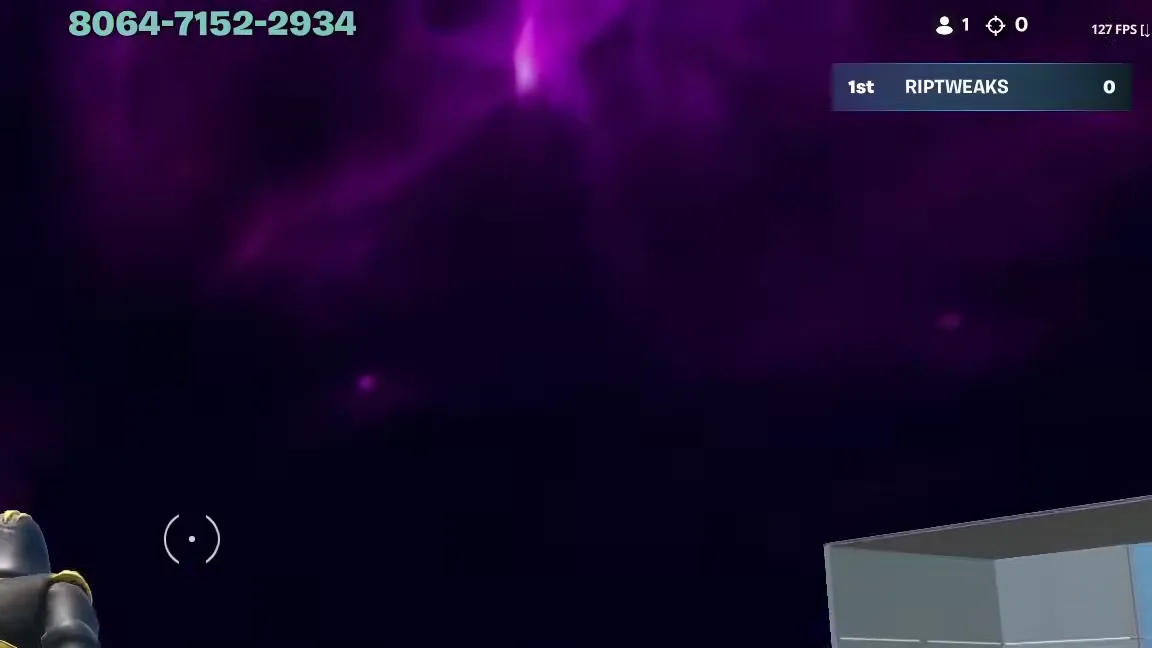
Write the number down. Without the same spot and the same settings before and after, you can't tell what the tweaks did.
Download RIP Tweaks from riptweaks.com or from the free-tweaks channel on our Discord (discord.gg/riptweaks), which is where the video gets it. Save the file, run the installer, click Next and wait for it to finish.
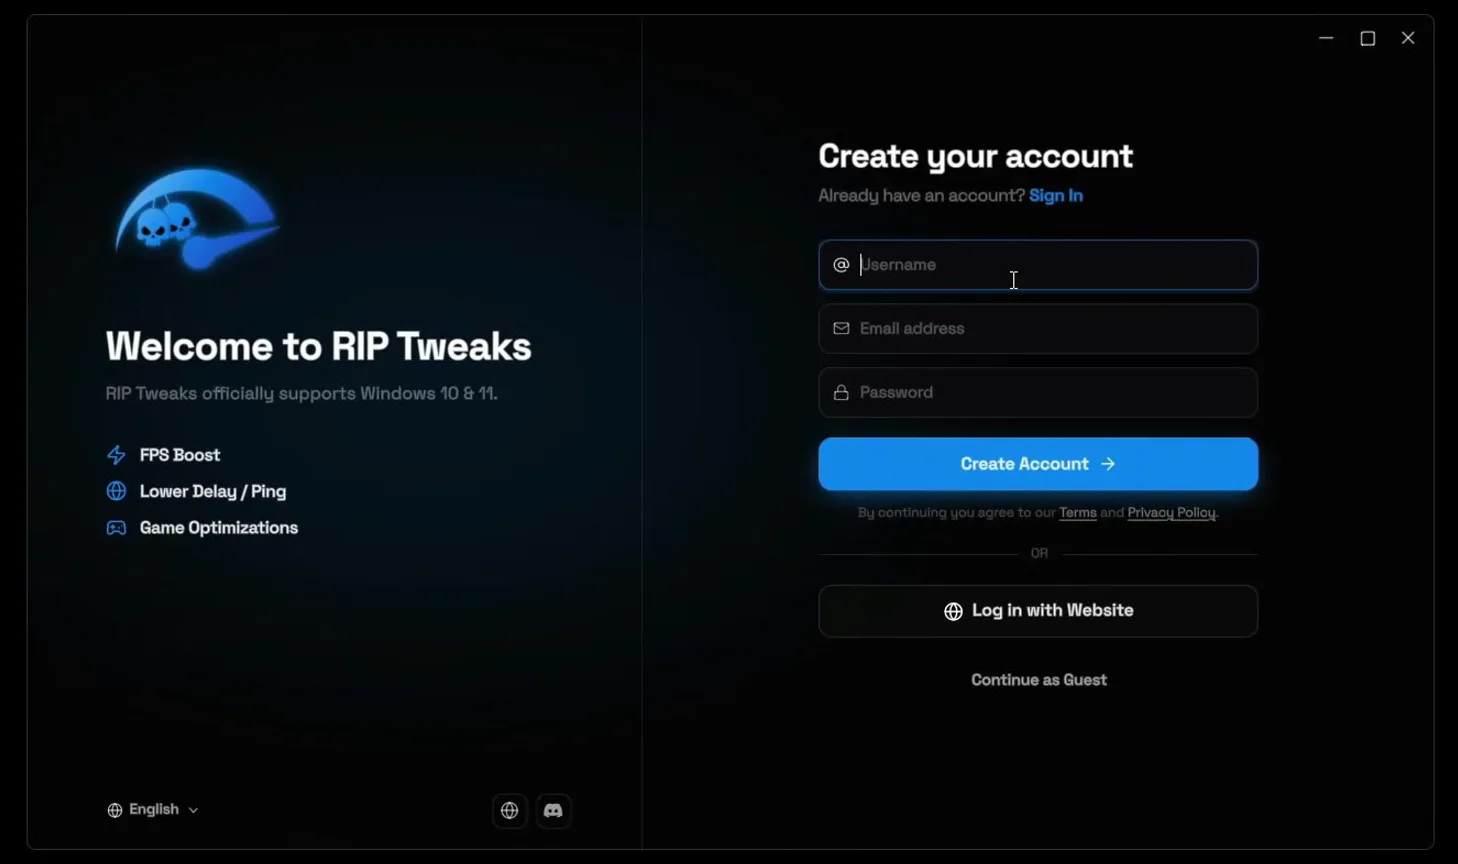
Type a username, your email and a password, click Create Account and fill out the short questionnaire. The welcome screen also notes that the app supports Windows 10 and 11.
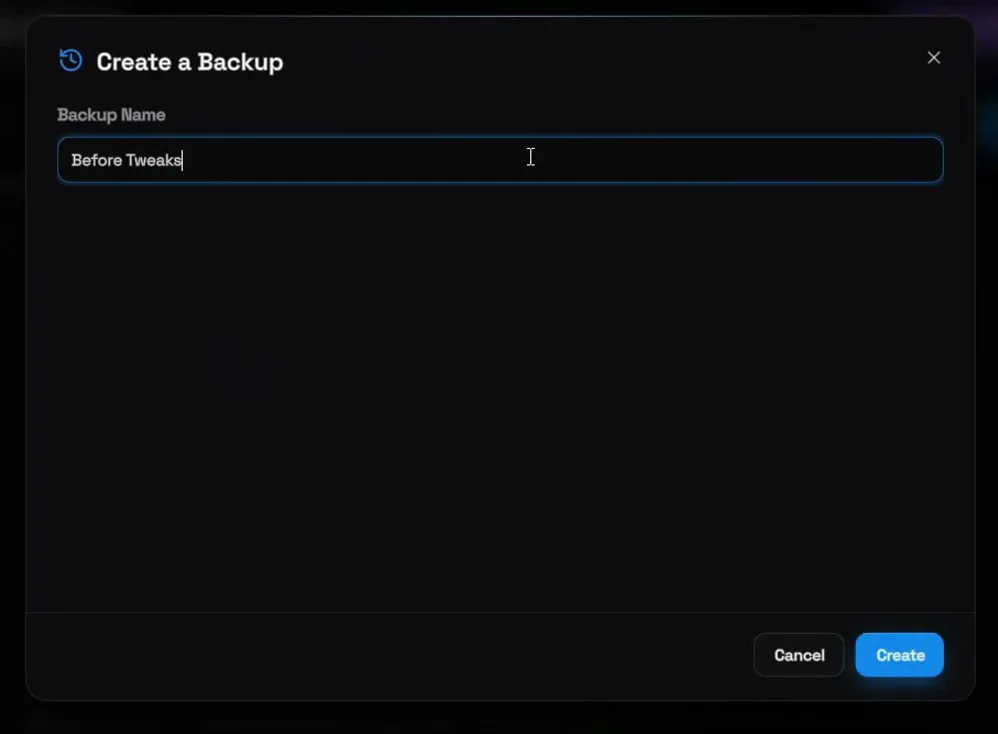
Before any tweak, open Backups in the left sidebar, click Create new, name it Before Tweaks and click Create. Wait until it finishes.
BackupsCreate newBefore TweaksCreate
How to undo it
If something feels off later, you have two ways back: switch a single tweak off where you turned it on, or restore the Before Tweaks backup to undo everything at once.
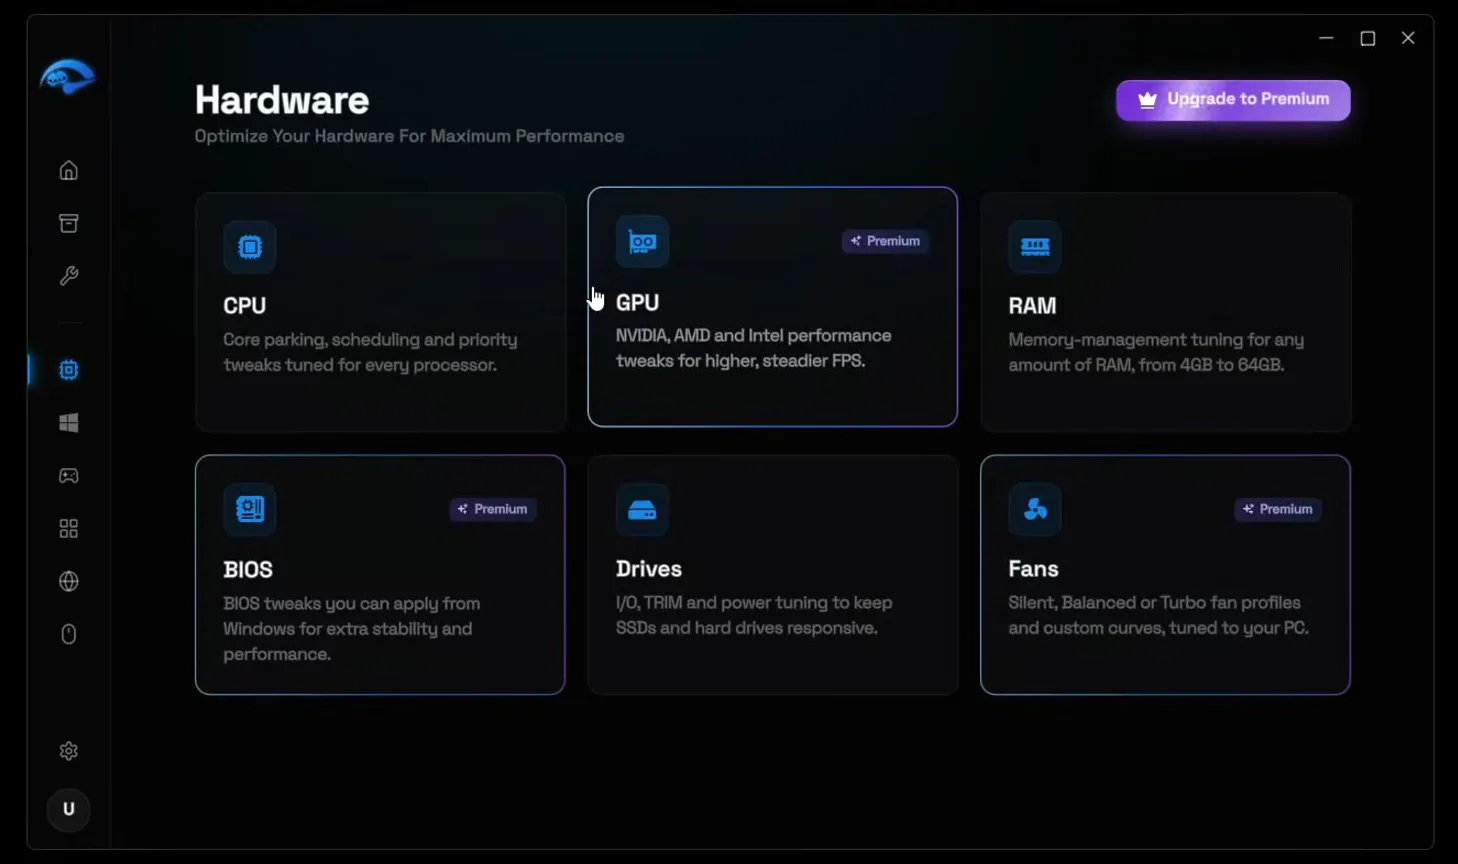
Open Hardware. It has one card per part, and the video goes through them in order:
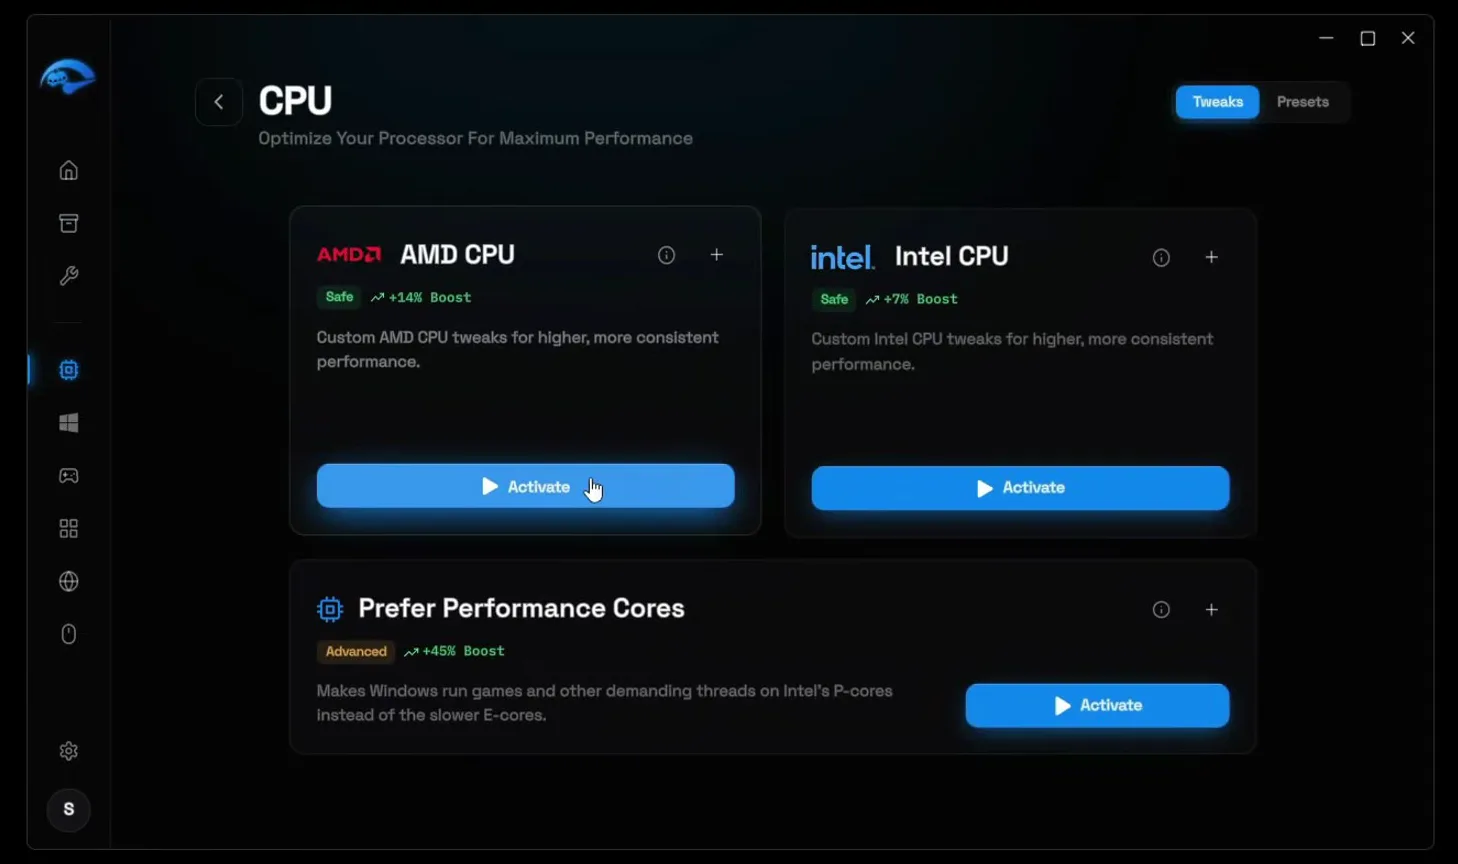
- CPU: click Activate on the card for your processor brand. The video has an AMD processor, so it activates AMD CPU.
- GPU: optimize the tweaks for your card's brand. The video has NVIDIA and turns on all of the NVIDIA ones.
- RAM: click Optimize RAM, pick your installed amount (
16 GBin the video) and click Apply. - BIOS: apply the BIOS optimizations for performance.
- Drives: optimize your SSD.
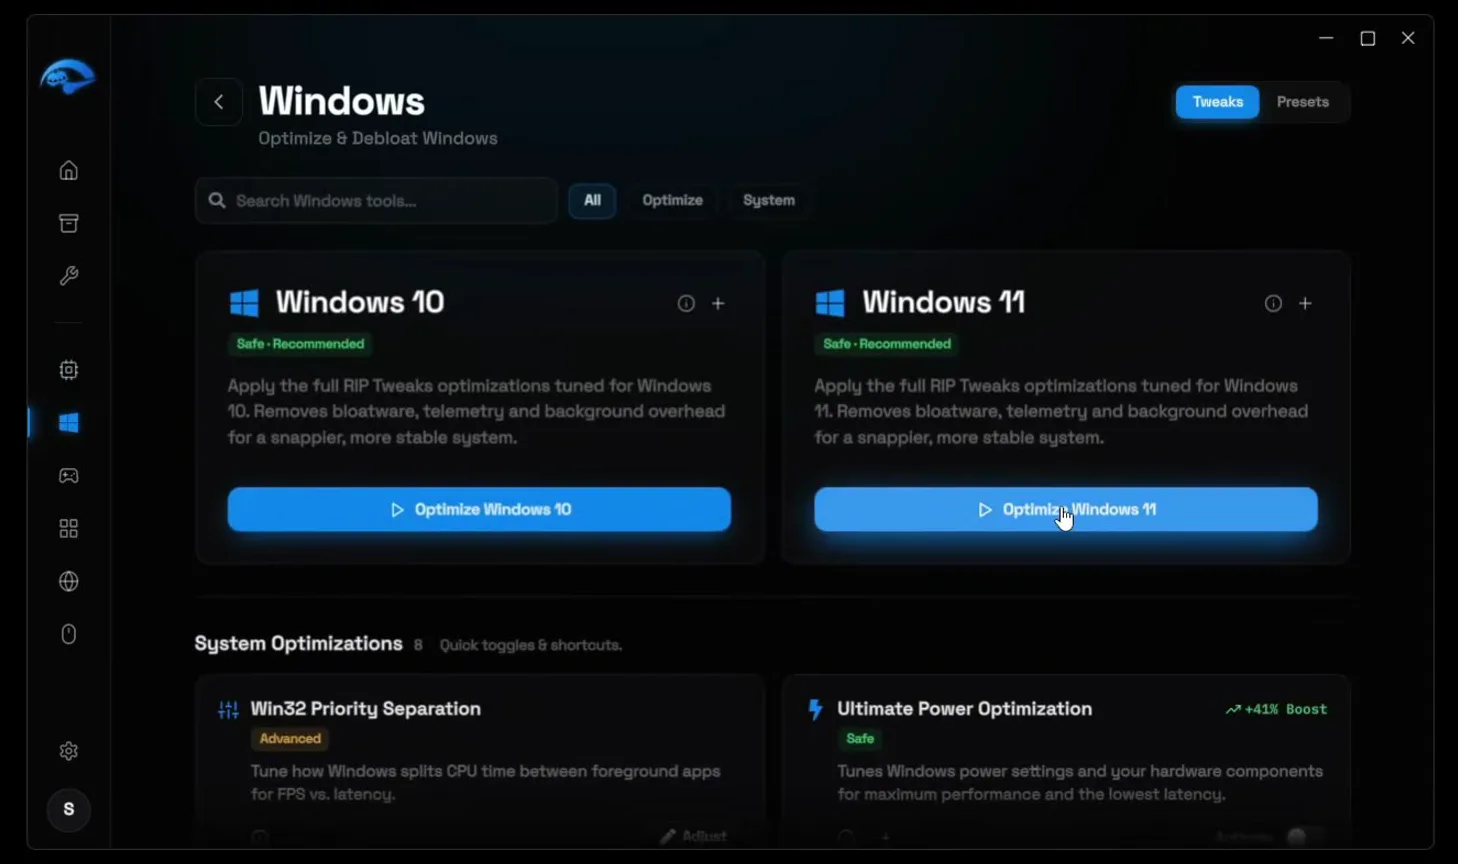
Go to Windows and click the button for your version: Optimize Windows 11 in the video, Optimize Windows 10 if that is what you run.
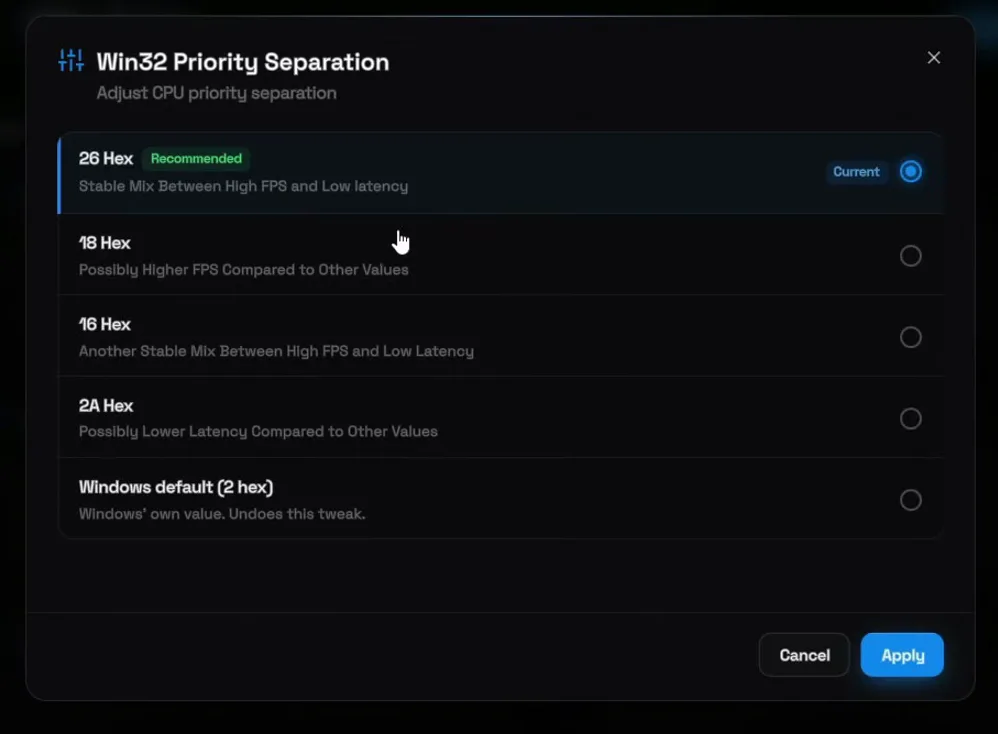
Below it, under System Optimizations, click Adjust on Win32 Priority Separation. It decides how Windows splits processor time between the game in front and the apps behind it. The video picks 26 Hex, the value the app marks Recommended, and clicks Apply.
WindowsWin32 Priority SeparationAdjust26 HexApply
Tip
The video prefers 26 Hex but suggests trying the others too. The window describes them: 18 Hex for possibly higher FPS, 2A Hex for possibly lower latency. Change one value at a time and retest at your FPS spot.
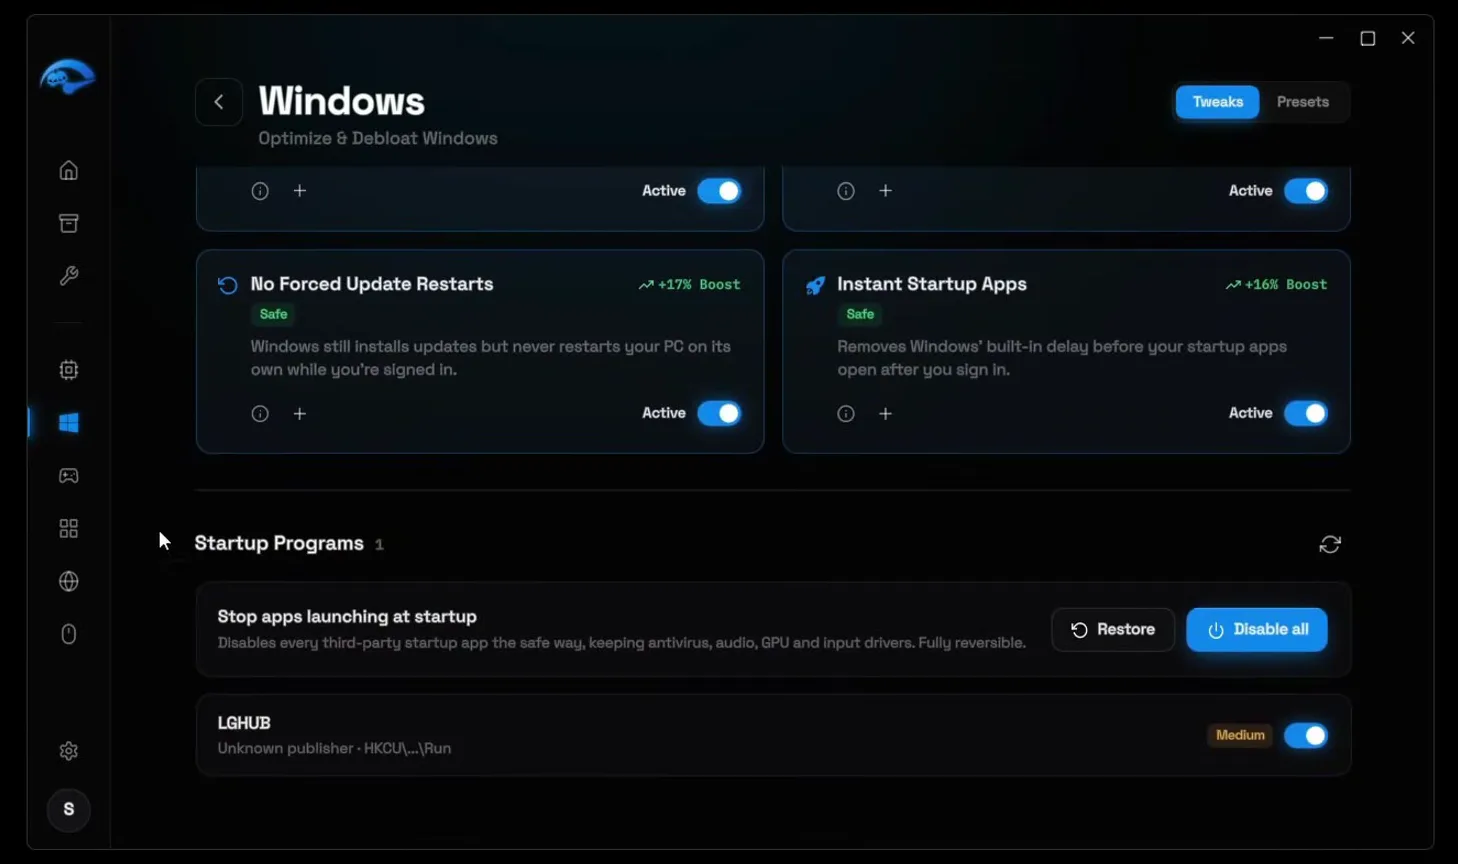
Still on the Windows page, the video switches on all of the system optimizations, including the power optimization, Storage Sense, background apps and hibernation options. Every card shows Active when it is on.
Then scroll to Startup Programs and click Disable all. The video calls this the best part: apps that start with every boot stop competing with Fortnite for your processor and memory. The app keeps antivirus, audio, GPU and input drivers, and Restore brings the list back.
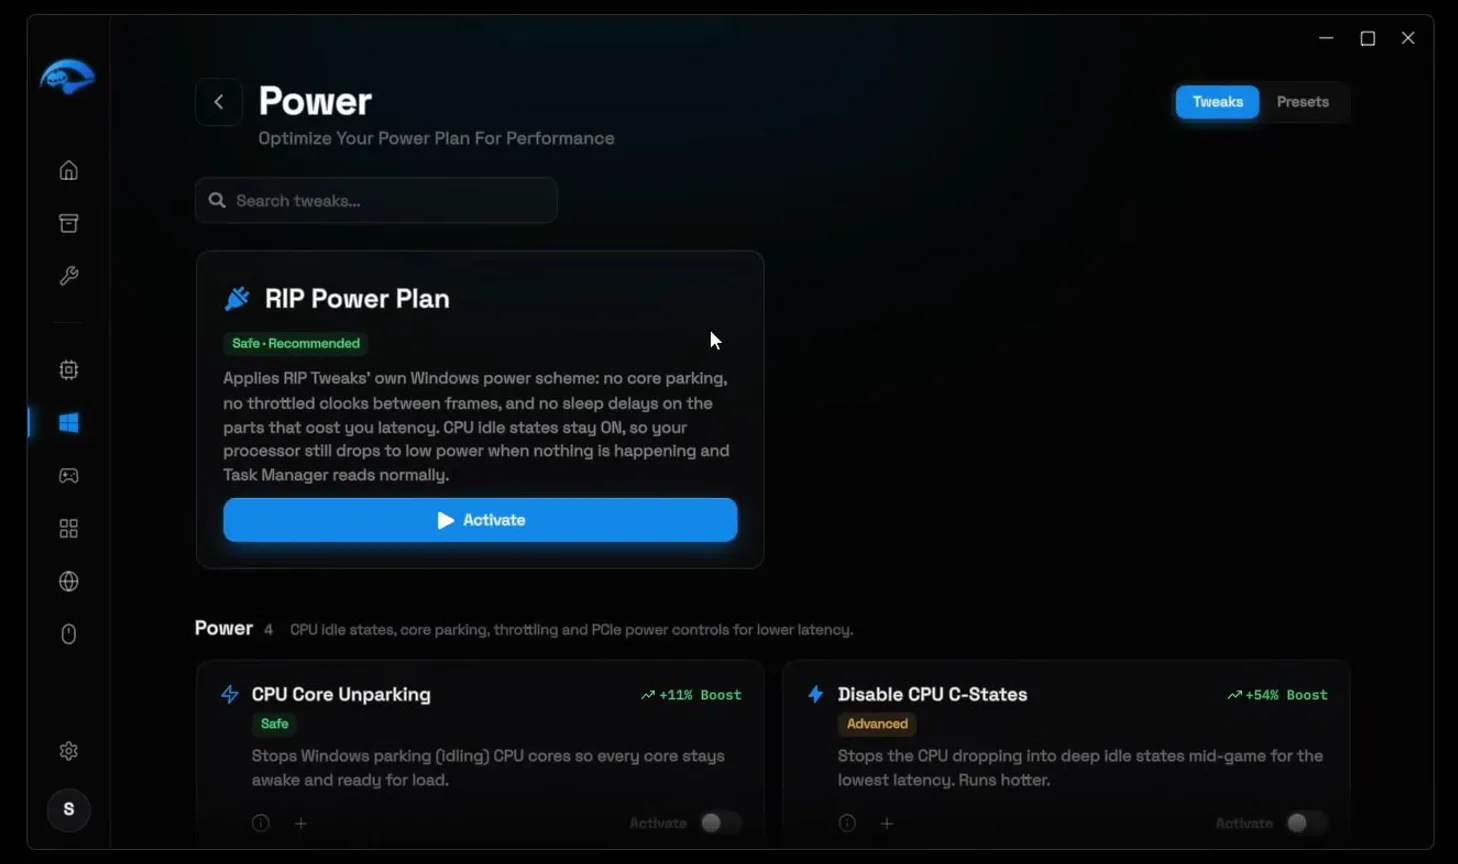
Most PCs run Windows' Balanced or High Performance plan. Open Power and click Activate on the RIP Power Plan, the app's own power scheme with no core parking and no sleep delays on the parts that cost you latency.
WindowsPowerRIP Power PlanActivate
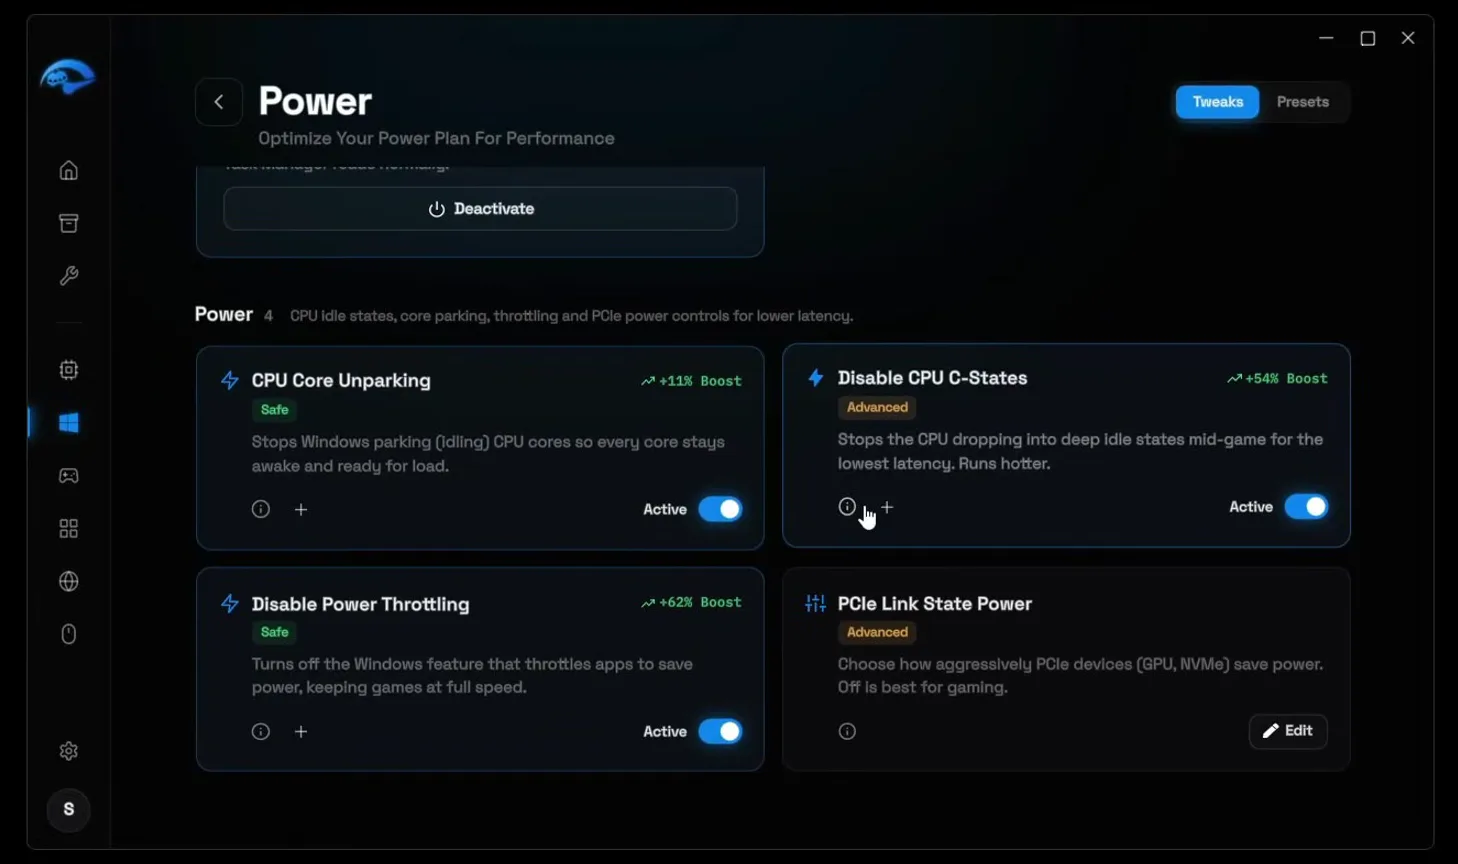
Next, turn on the power tweaks below it: CPU Core Unparking, Disable CPU C-States and Disable Power Throttling. For PCIe Link State Power, click Edit, choose Off and apply. Not sure what a tweak does? The i button next to it explains it.
Careful
The app marks Disable CPU C-States as Advanced and says it runs hotter: the processor stays awake instead of dropping into deep idle states. On a laptop like the one in the video, keep an eye on temperatures and switch it off if they climb too high.
Open Debloat and click Run Basic. The app describes Basic as a reversible cleanup that is safe on any PC: it removes preinstalled Microsoft apps, turns off telemetry and quiets idle background services. On the PC in the video it removed around 37 items.
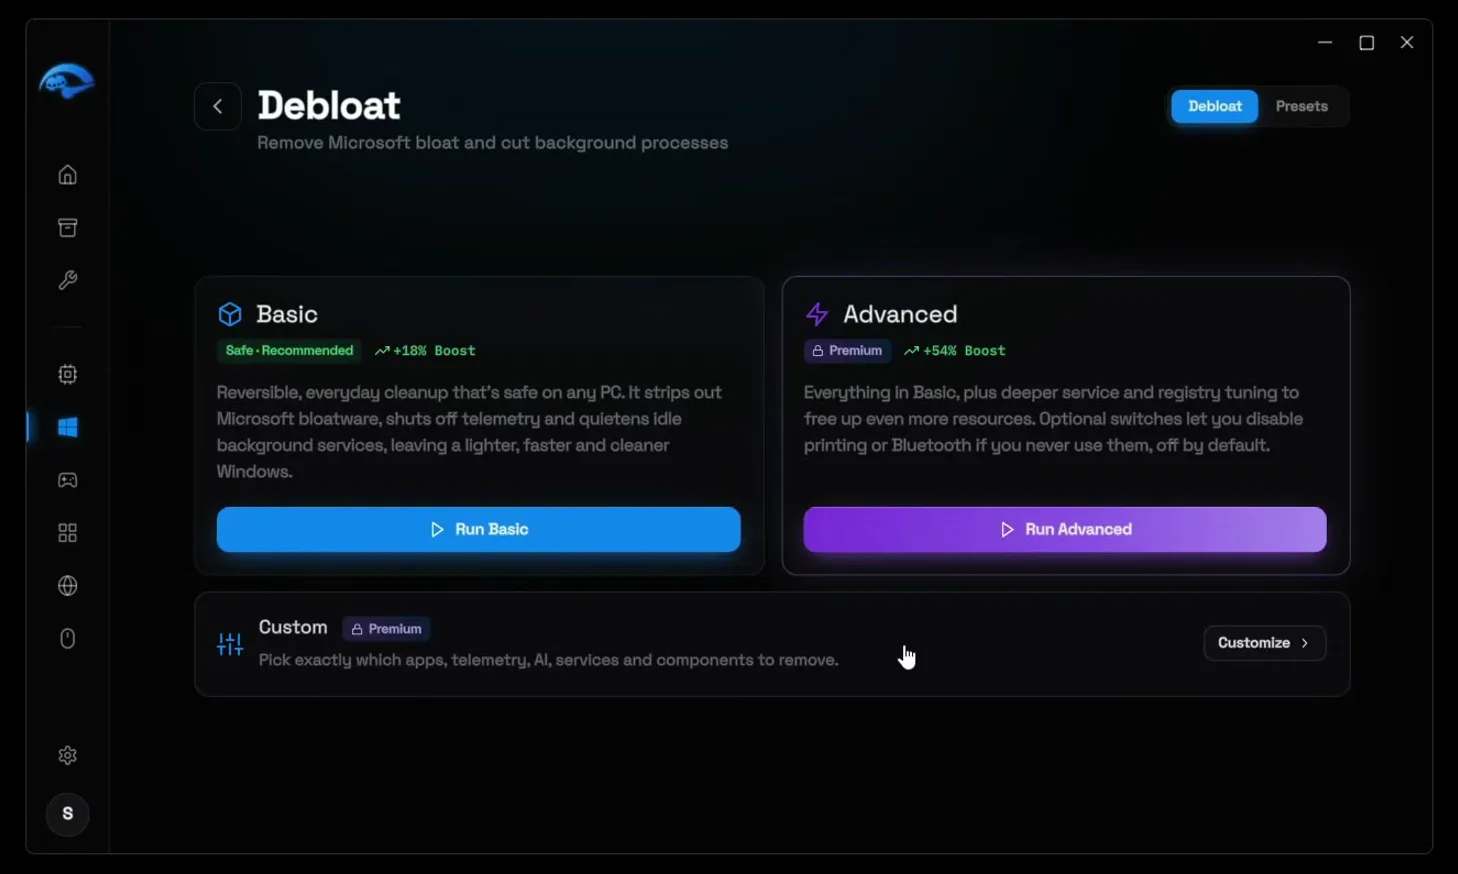
If you'd rather choose item by item, Custom lets you pick telemetry, AI features, services and components yourself.
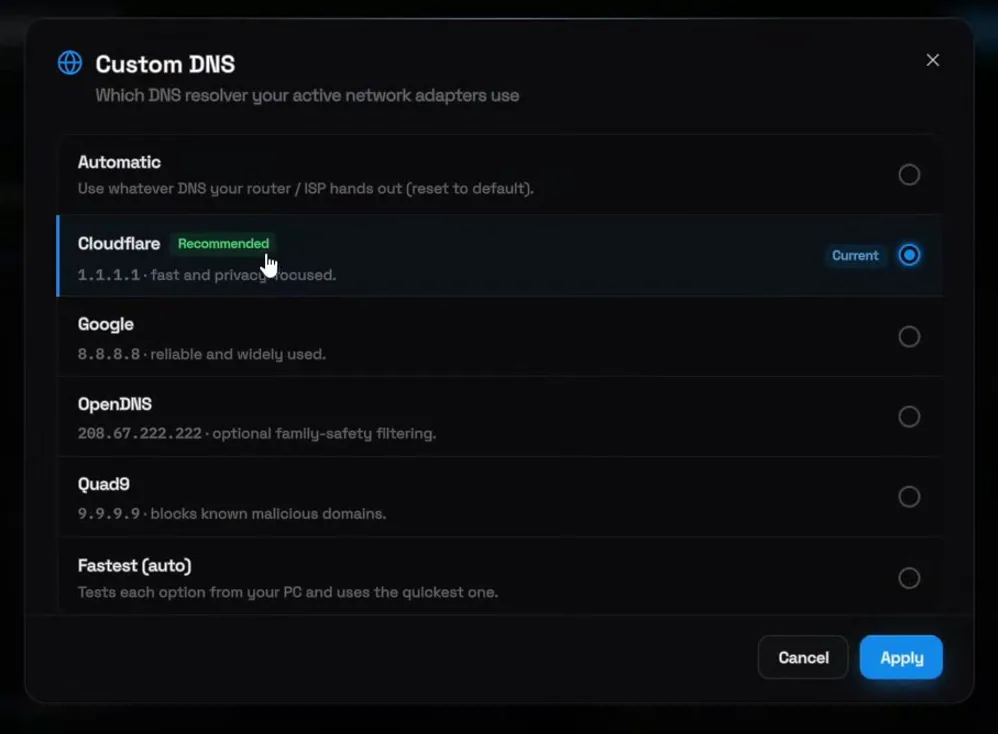
Open Network, click Custom DNS, select Cloudflare (1.1.1.1) and click Apply. The video uses Cloudflare but says any of them is fine to test; Fastest (auto) tests each one from your PC and picks the quickest.
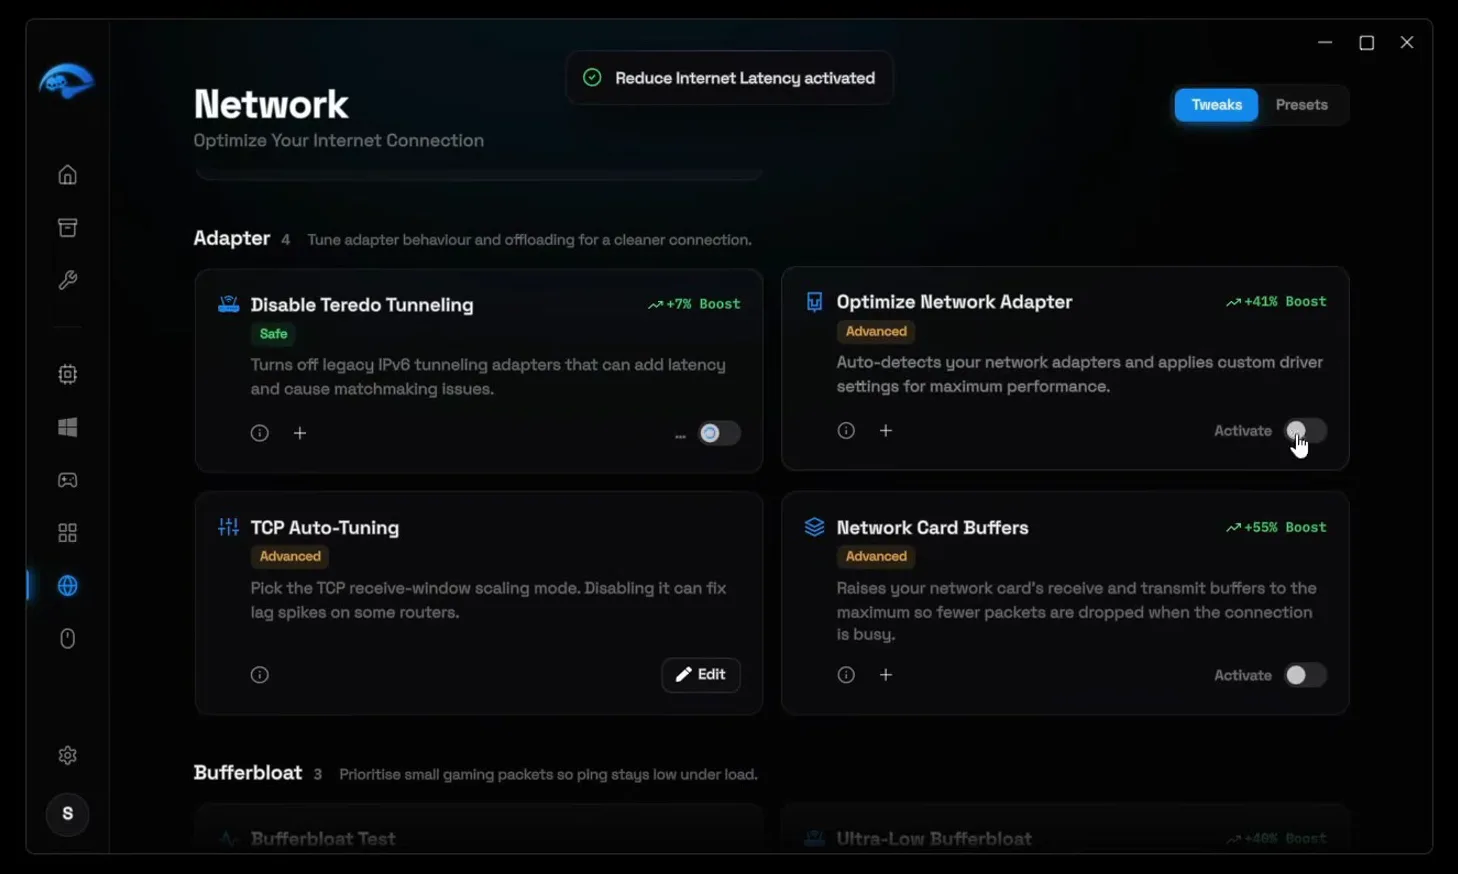
Then activate the network tweaks on the page, such as Reduce Internet Latency, Optimize Network Adapter and Network Card Buffers. For TCP Auto-Tuning, click Edit, choose Normal and apply.
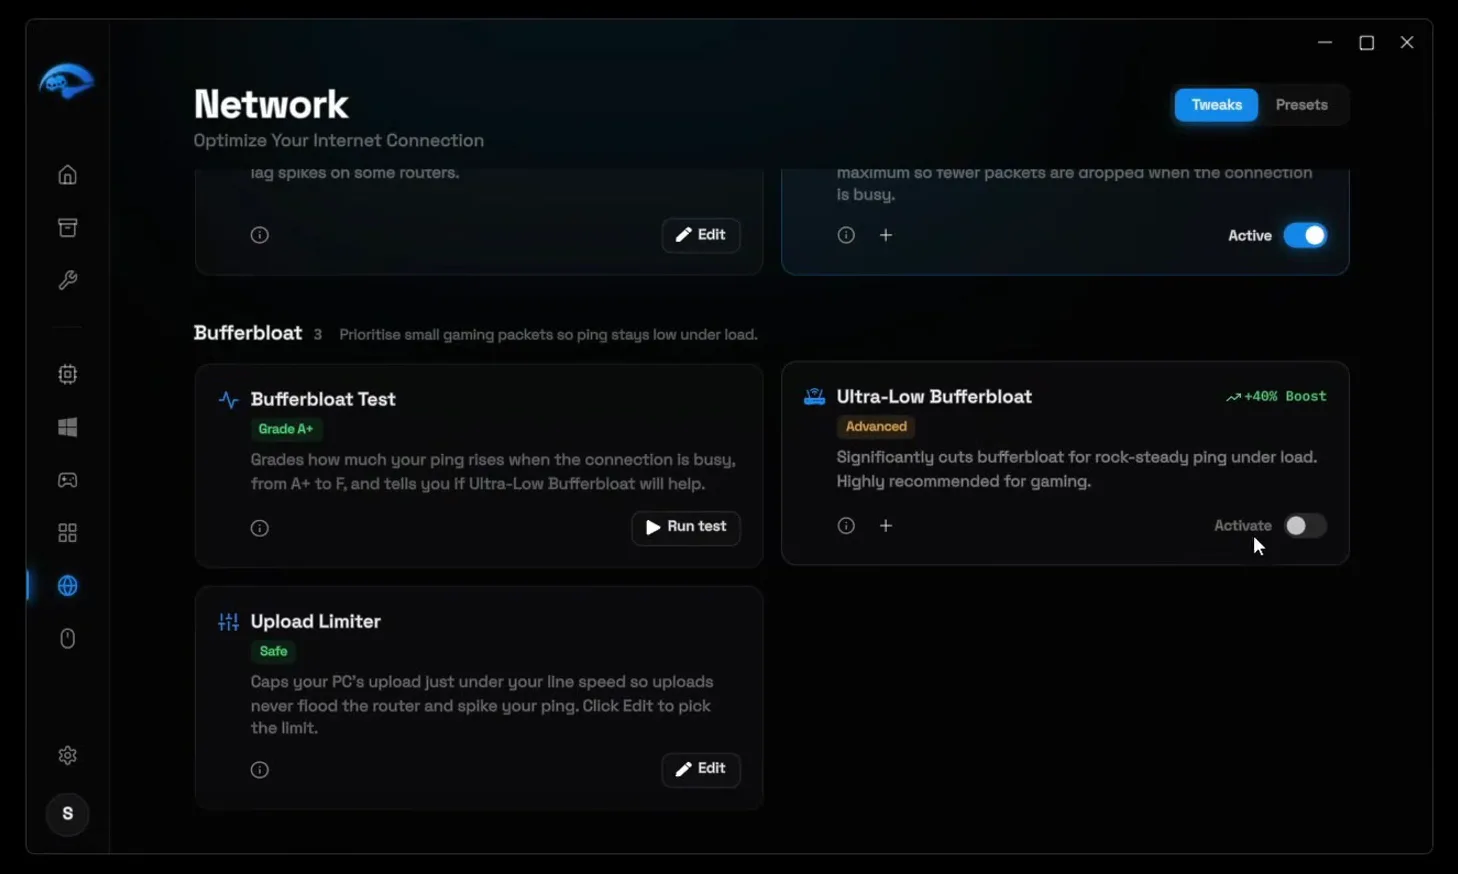
Bufferbloat is when your ping jumps as soon as something else uses the connection, because the router queues too much data. The video calls it a top reason for unstable connections and packet loss that people never trace. Scroll to Bufferbloat and click Run test on Bufferbloat Test.
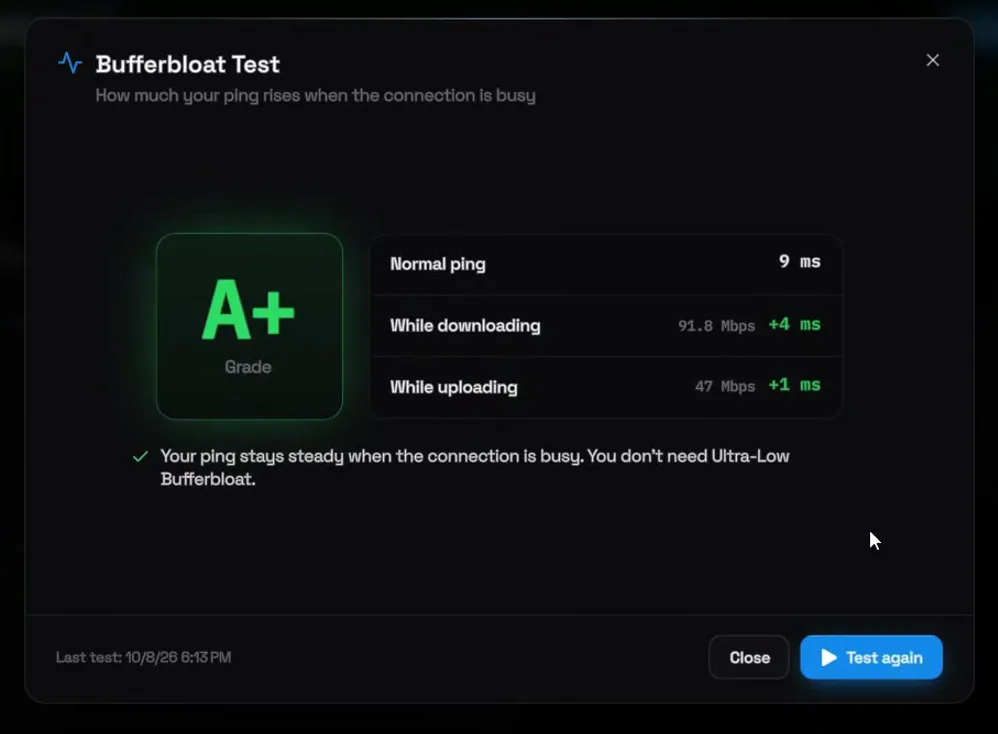
The test measures your ping at rest, while downloading and while uploading, then grades it from A+ to F. On the PC in the video it got A+: 9 ms normal ping, only 4 ms more while downloading and 1 ms more while uploading, so that PC did not need the fix.
Good to know
Turn on Ultra-Low Bufferbloat only if your grade comes back as C, D or worse. With an A grade there is nothing to fix. Our bufferbloat guide explains the grades in detail.
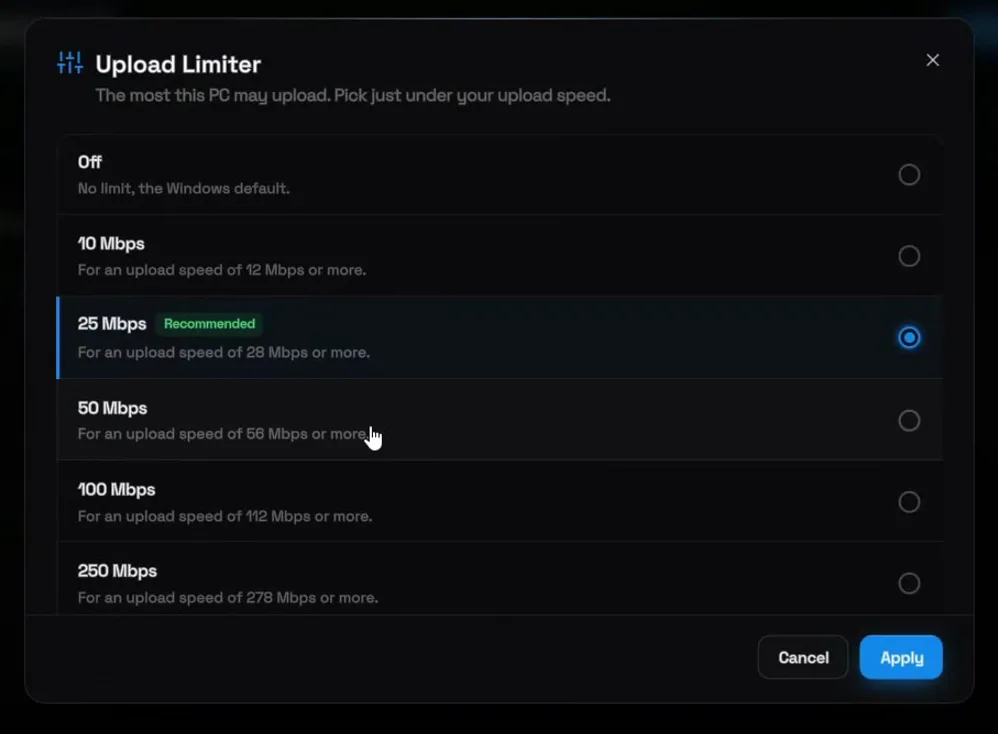
The same test shows your download and upload speed (91.8 and 47 Mbps in the video). The Upload Limiter caps how much your PC uploads, so it never floods the router with more than the line can really send and your ping spikes less when something uploads in the background.
Click Edit on Upload Limiter, pick a limit and click Apply. The window says to pick just under your upload speed, and each option shows the line it is meant for: 25 Mbps is for an upload speed of 28 Mbps or more, 50 Mbps for 56 Mbps or more. With 47 Mbps in the video, the app marked 25 Mbps as Recommended.
NetworkUpload LimiterEditPick a limitApply
How to undo it
If you upgrade your internet or want the limit gone, open the Upload Limiter again, click Edit, choose Off and apply.
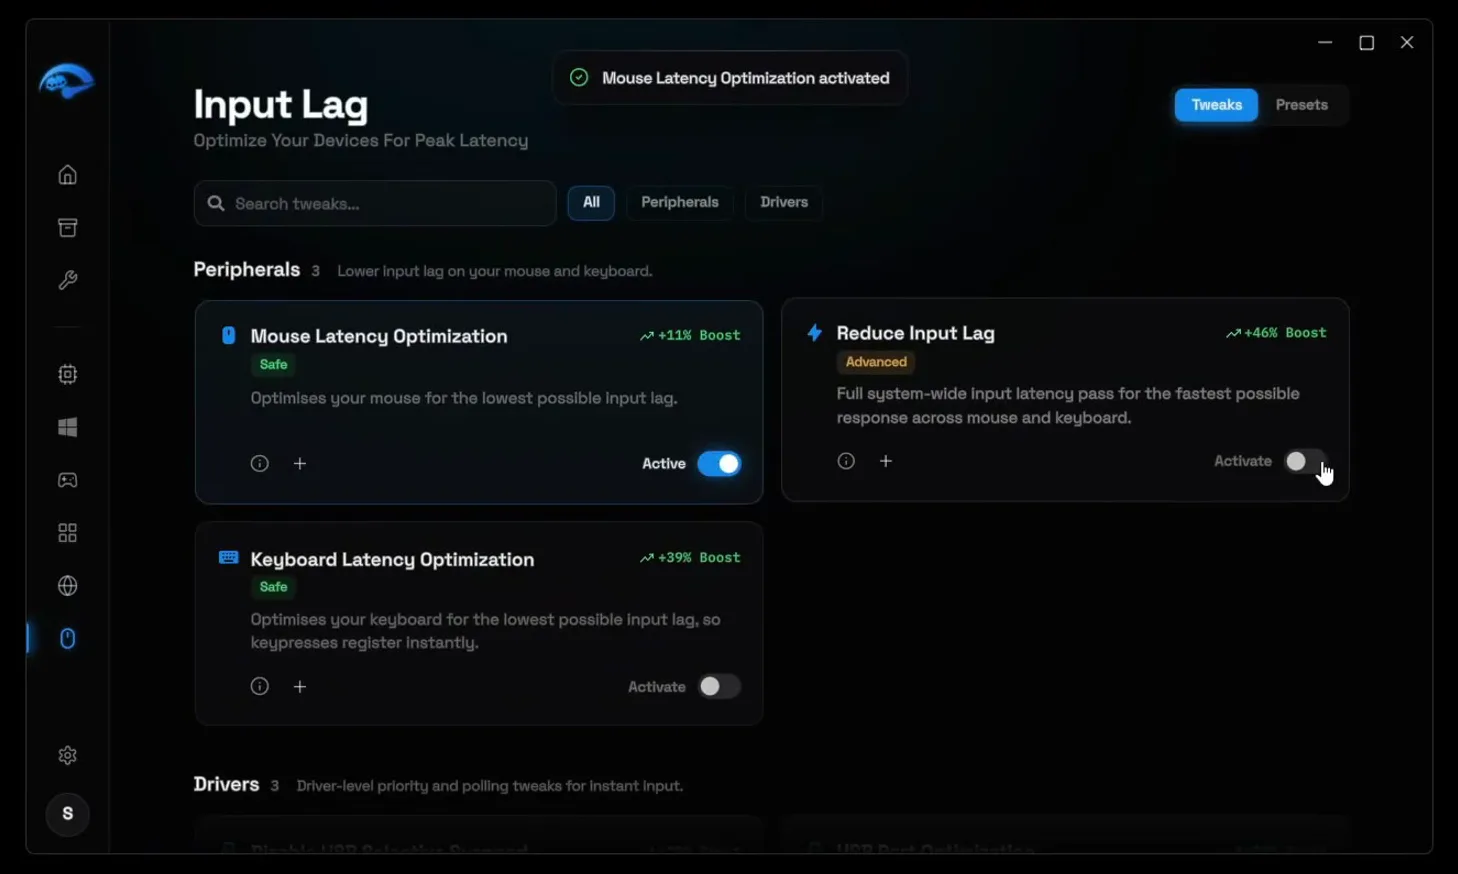
Open Input Lag and activate the optimizations: the peripheral tweaks such as Mouse Latency Optimization, Keyboard Latency Optimization and Reduce Input Lag, then the driver tweaks below them.
On the same page, open the Polling Rate Optimizer, the step the video calls the craziest thing you can do. It lists your mice: click Optimize on yours and it moves to the highest rate it supports. The video's mouse shows Optimized, 1000 Hz.
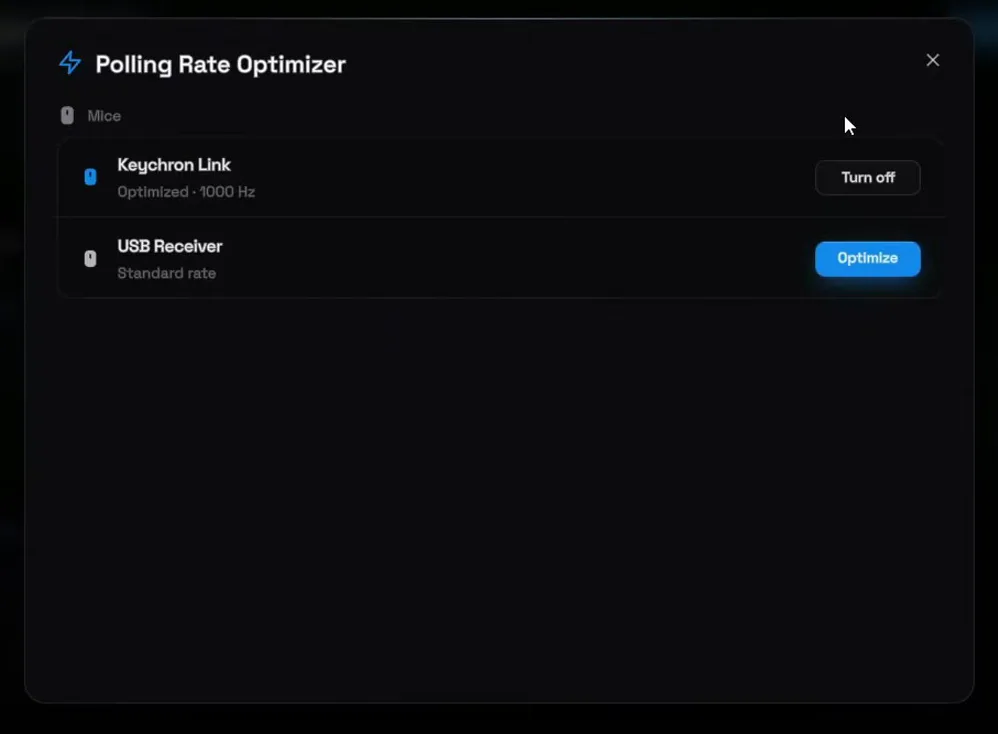
More on what polling rate changes is in our polling rate optimizer guide.
Go to Games and open Fortnite. Select Balanced, the free game mode: its Smart Game Boost quiets your background apps while you play (21 apps on the PC in the video) and turns on game tweaks for FPS and ping. Everything reverts when you stop the mode or close the game.
With an NVIDIA card you can also apply a Profile Inspector profile: click Next, select FPS Boost Profile (or Potato Graphics if you need extra FPS on a low-end PC) and click Finish. Then click Launch: RIP Tweaks shows Fortnite as playing while it starts with the tweaks applied.
GamesFortniteBalancedProfile InspectorFPS Boost ProfileLaunch
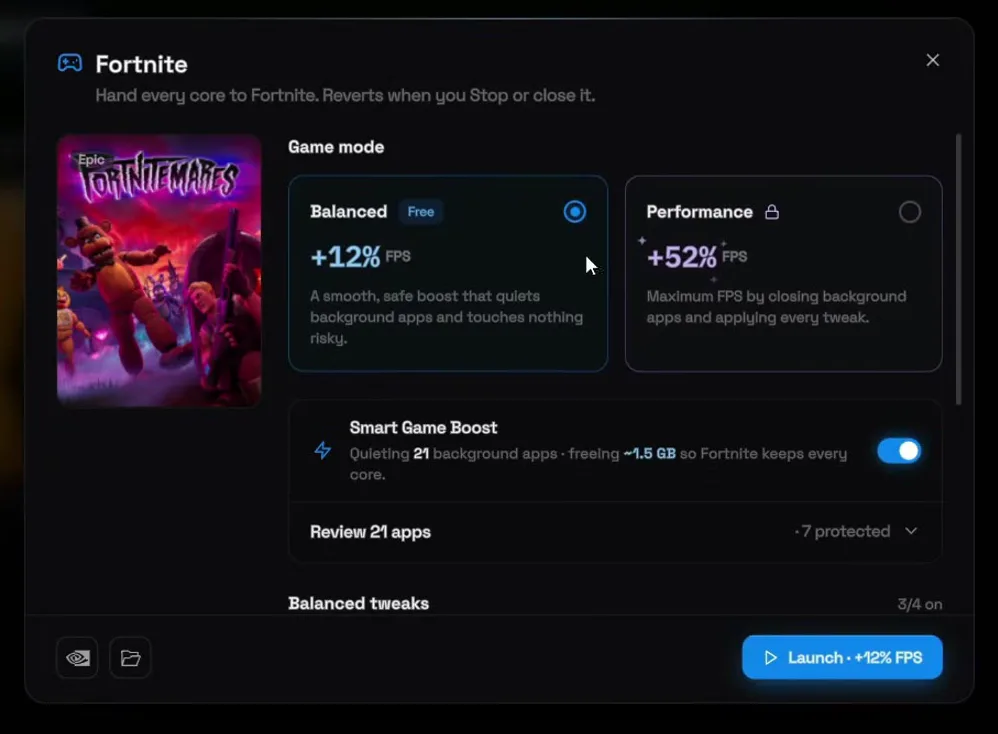
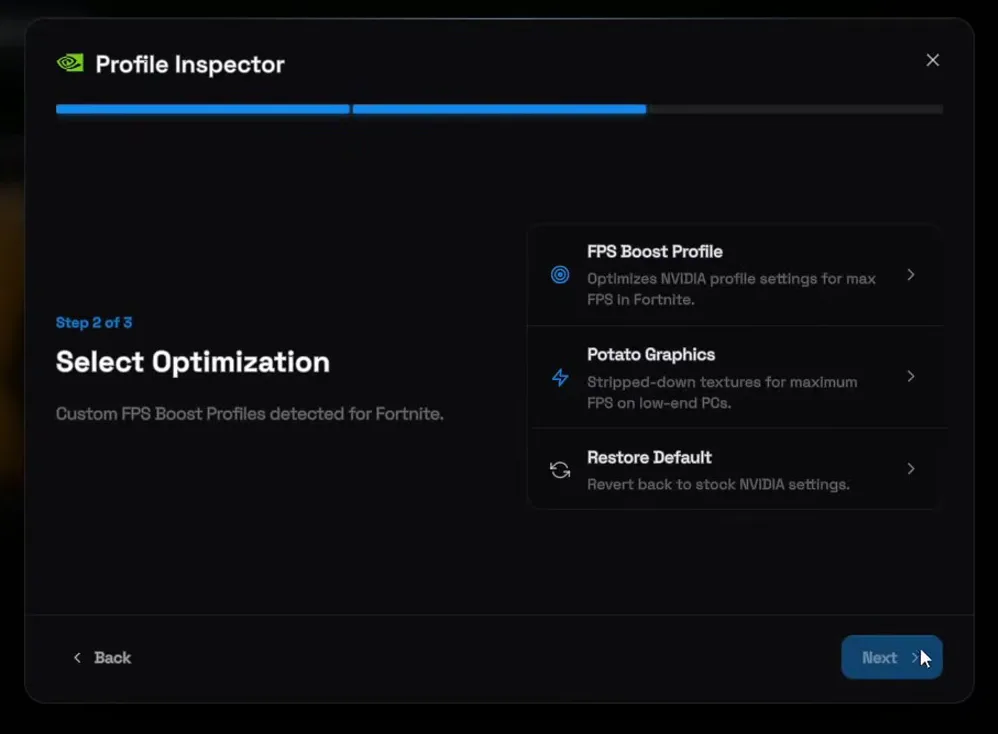
Pick Potato Graphics only if FPS matters more than how the game looks: it strips textures down. Restore Default in the same window puts the stock NVIDIA settings back, and our Fortnite potato graphics guide shows what it looks like.
Go back to the same spot and look at the sky again. On the PC in the video the counter now reads around 280 FPS, close to double the 150 to 160 FPS from the start.
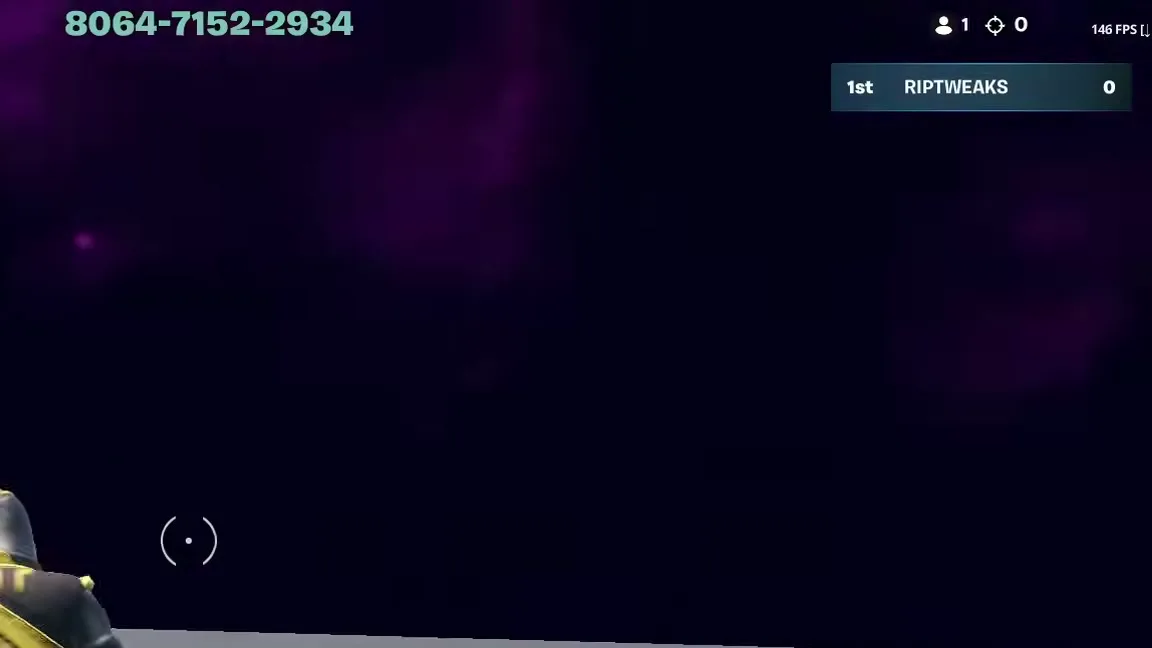
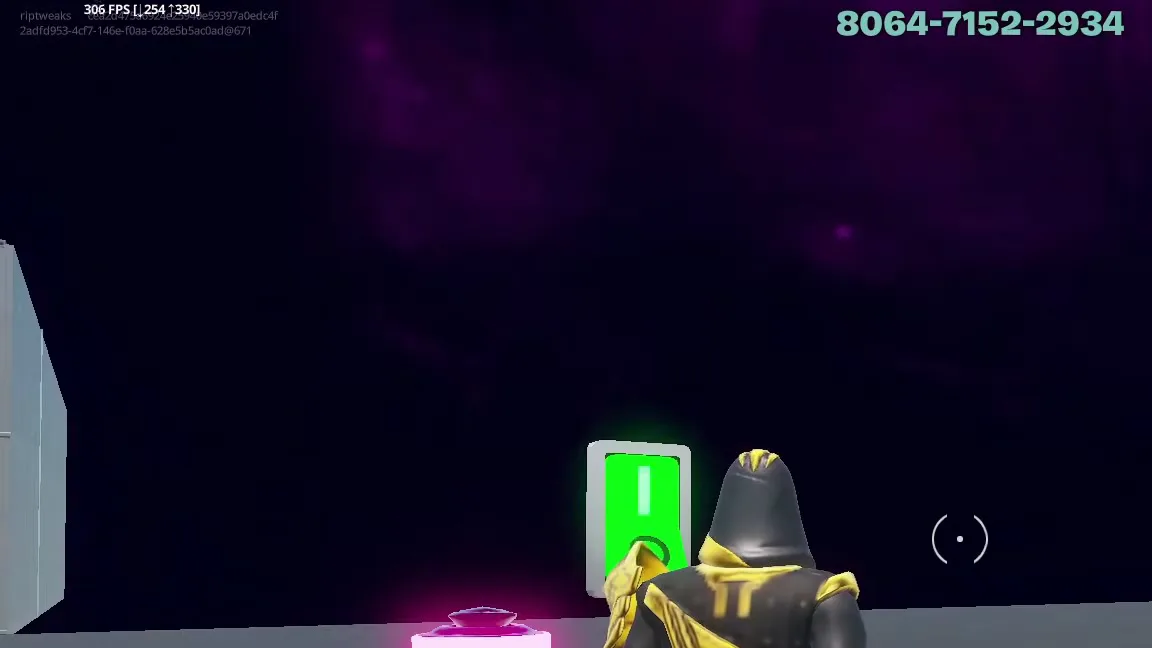
Your result depends on your processor, graphics card and how much was running in the background before, so treat the video's numbers as one example, not a promise.
How to check it worked
- FPS: compare the counter in the same spot, same settings, before and after. Look at the low end of the counter too, not only the top number.
- Ping: run the Bufferbloat Test again. Your grade should hold or improve, and ping while uploading should rise less with the Upload Limiter on.
- Input delay: open the Polling Rate Optimizer and check your mouse says Optimized with its rate (1000 Hz in the video).
- Game mode: after you click Launch, RIP Tweaks should show Fortnite as playing.
Want to try your settings in a real fight? Play our free 1v1 map, RIP Tweaks 1V1 (code 8541-1720-3175).
For Fortnite's own settings on top of this, see our Fortnite input delay and FPS guide.
Key settings at a glance
FAQ
How do I boost FPS in Fortnite in 2026?
Measure your FPS in one spot, then optimize the PC under the game: hardware, Windows, the power plan, debloat and background apps. In the video that took Fortnite from 150 to 160 FPS to around 280 FPS looking at the sky on the lowest settings.
How do I lower input delay in Fortnite?
The video does it in three places: Win32 Priority Separation at 26 Hex, the RIP Power Plan with core parking and C-States off, and the Input Lag page with the mouse at 1000 Hz. Higher, steadier FPS lowers delay too, because each frame reaches the screen sooner.
Will I get the same FPS as the video?
Not necessarily. The video's numbers come from one laptop with an RTX 4060 Laptop GPU and 16 GB of RAM. A PC with many startup apps or a weak power plan typically gains more than one that is already clean, so measure your own before and after.
Does changing DNS lower my ping in Fortnite?
DNS mainly decides how fast addresses are looked up; your in-match ping depends on your connection and the route to the server. For ping that jumps while someone downloads or uploads, the Bufferbloat Test, Ultra-Low Bufferbloat and the Upload Limiter are the steps that target it.
What does the bufferbloat grade mean?
It shows how much your ping rises when the connection is busy, from A+ (barely moves) to F. The video got A+ with 9 ms at rest, +4 ms while downloading and +1 ms while uploading. Turn on Ultra-Low Bufferbloat if you get C, D or worse.
Do I need Premium for this?
No. The Basic debloat, the RIP Power Plan, the network and input tweaks and the Balanced game mode are free. Some cards carry a Premium badge in the app, such as GPU and BIOS in Hardware, the Advanced and Custom debloat and the Performance game mode.
Can I undo the tweaks?
Yes. Every tweak switches off where you turned it on, Win32 Priority Separation has a Windows default option, the Upload Limiter has Off, and the Before Tweaks backup brings the whole PC back to where you started.
Does this work on Windows 10?
Yes. RIP Tweaks supports Windows 10 and 11, and the Windows page has its own Optimize Windows 10 button. Every other step in the video looks the same on both.
 RIP Tweaks
Do it in a few minutes with RIP Tweaks
- Free plan for Windows 10 and 11
- A backup first, and every tweak can be switched off again
- Made for higher FPS, lower input lag and steadier ping
Free · Windows 10 and 11
