Fix Ping Spikes and Packet Loss in Any Game: DNS, QoS and a DSCP 46 Policy

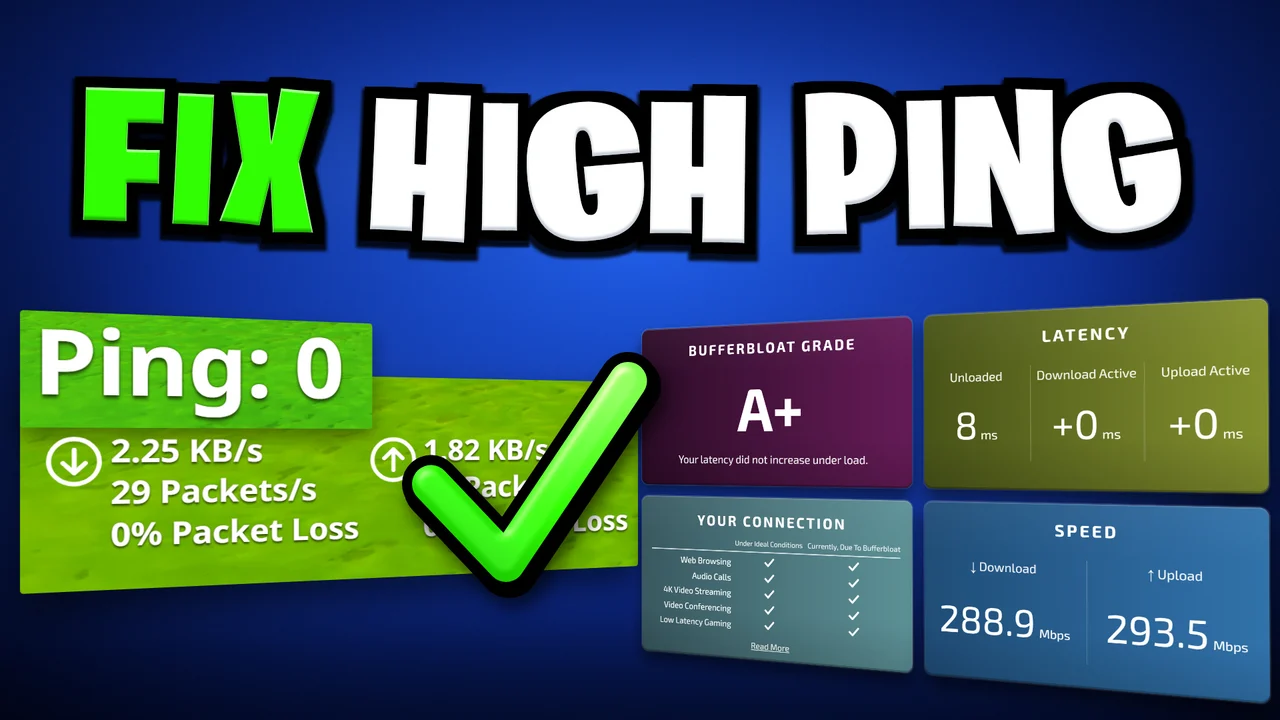
Written version of our video, every step checked against it.
Quick answer
- Create a restore point first, then download the Internet Boost pack from the RIP Tweaks Discord (yt-tweaks channel).
- Run DNS Jumper, click Fastest DNS, start the test and apply the fastest server.
- Make sure QoS Packet Scheduler is ticked on your network adapter, then in
gpeditset DSCP Marking Override to Ignored. - Create a Policy-based QoS policy named after your game with DSCP value
46, tied to the game's.exe, for TCP and UDP. - Type
256as the limit of your network adapter in the MSI utility, then run netrestart as admin.
This guide is for players on a Windows PC who get ping spikes or packet loss in Fortnite or any other online game and want a fix that costs nothing. It follows the December 2024 video step by step: a restore point, the free Internet Boost pack, a faster DNS server, the QoS settings, a DSCP 46 policy for Fortnite, one change in the MSI utility and a network restart. For the newer, app-based version of this fix, read our ping spikes and packet loss guide.
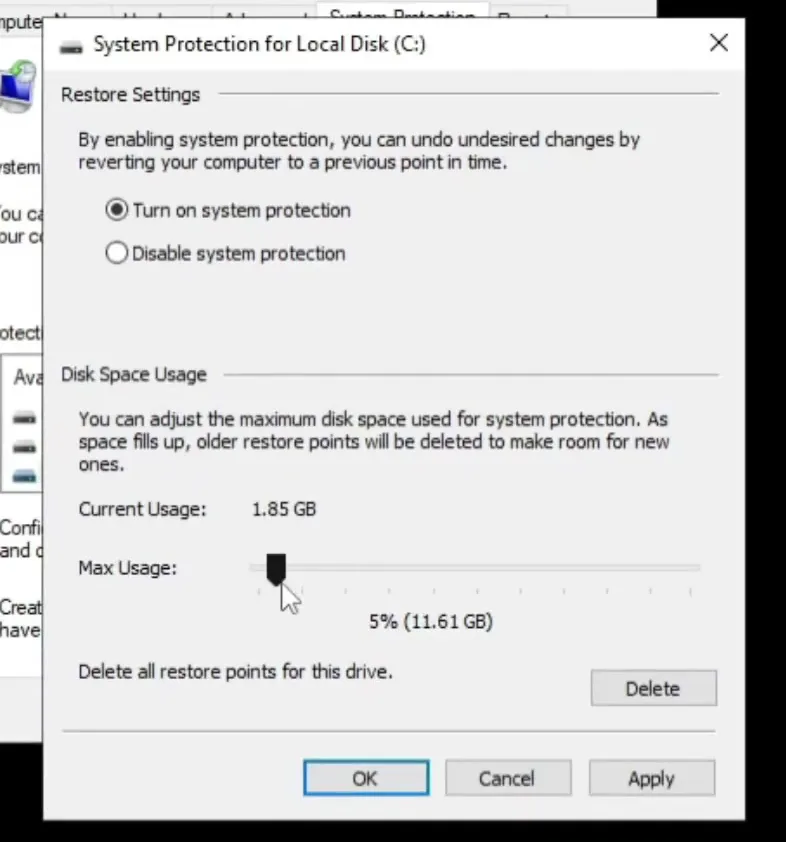
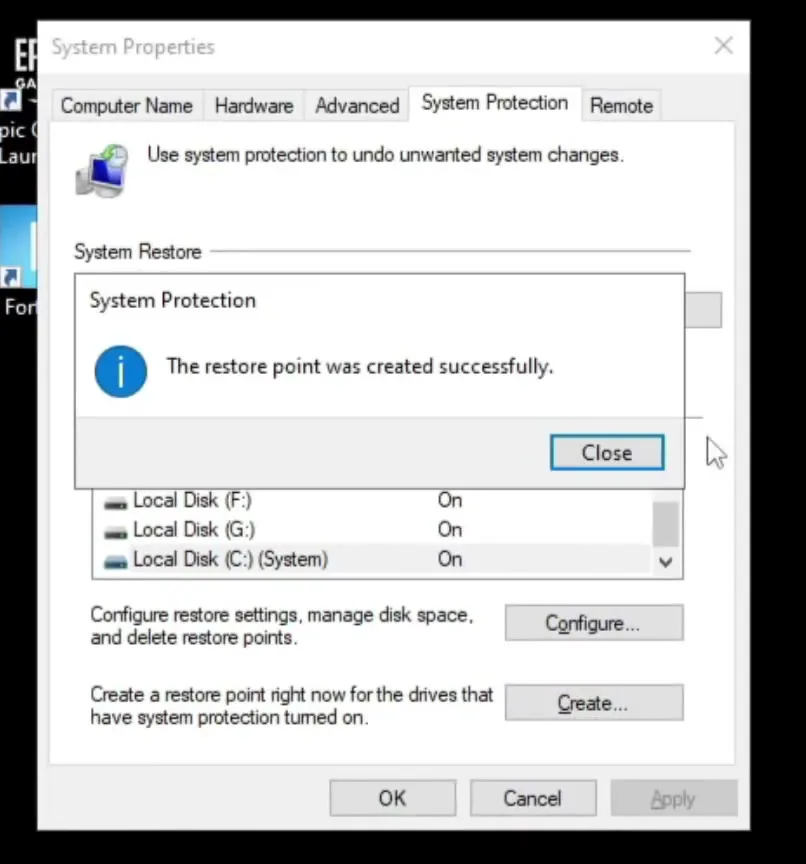
Every step below changes a network setting, so make a way back first. Type restore into the Windows search bar and open Create a restore point. Select the drive marked System (usually C:) and click Configure.
Search: restoreCreate a restore pointConfigureTurn on system protectionMax Usage 5%
Make sure Turn on system protection is selected and set Max Usage to at least 5%. Click Apply, then OK. Back in the System Protection tab, click Create, give the point any name and wait. Close the box when Windows says the restore point was created successfully.
Tip
If anything below makes your connection worse, this restore point is how you get back to the state before the video. Do not skip it.
All the tools in this video sit in one pack. Open discord.gg/riptweaks in your browser, join the server, open the yt-tweaks channel and download the Internet Boost pack. Save it anywhere. Right-click the file, use Open with, choose Windows Explorer and drag the content out.
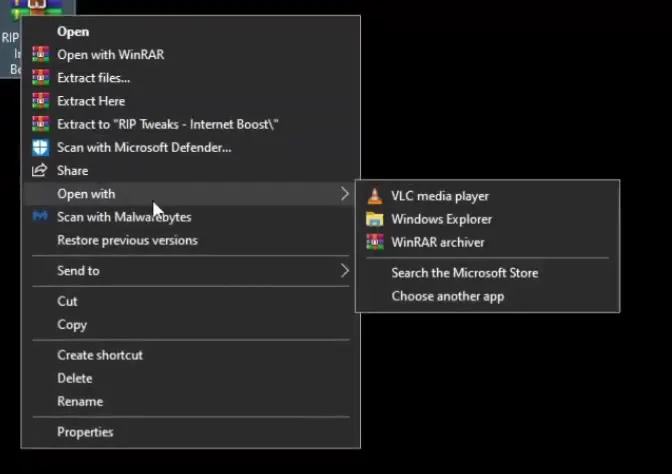
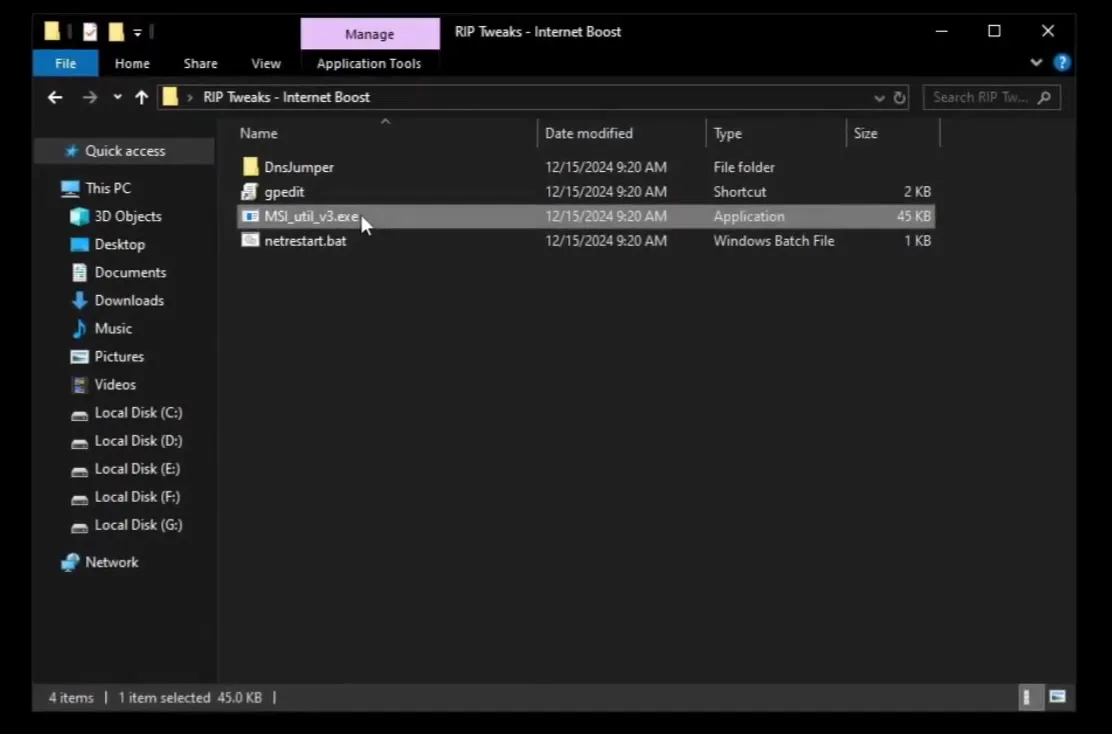
The pack holds four things: a DnsJumper folder, a gpedit shortcut, MSI_util_v3.exe and netrestart.bat. Each of the next steps uses one of them.
Open the DnsJumper folder and run DNS Jumper. Click Fastest DNS, then Start DNS Test, and wait a few seconds while it times every server in the list.
DnsJumperFastest DNSStart DNS TestApply DNS Server
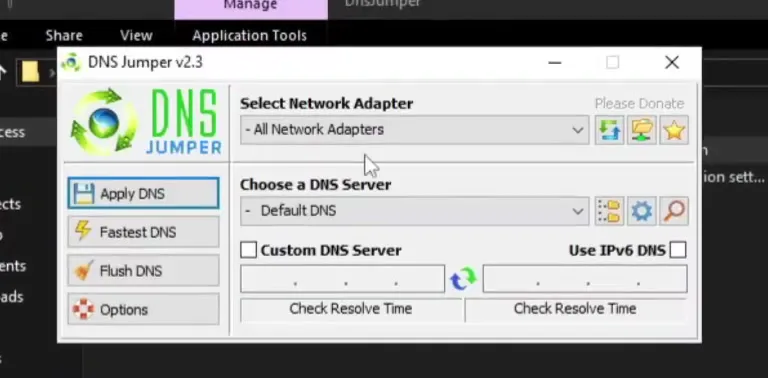
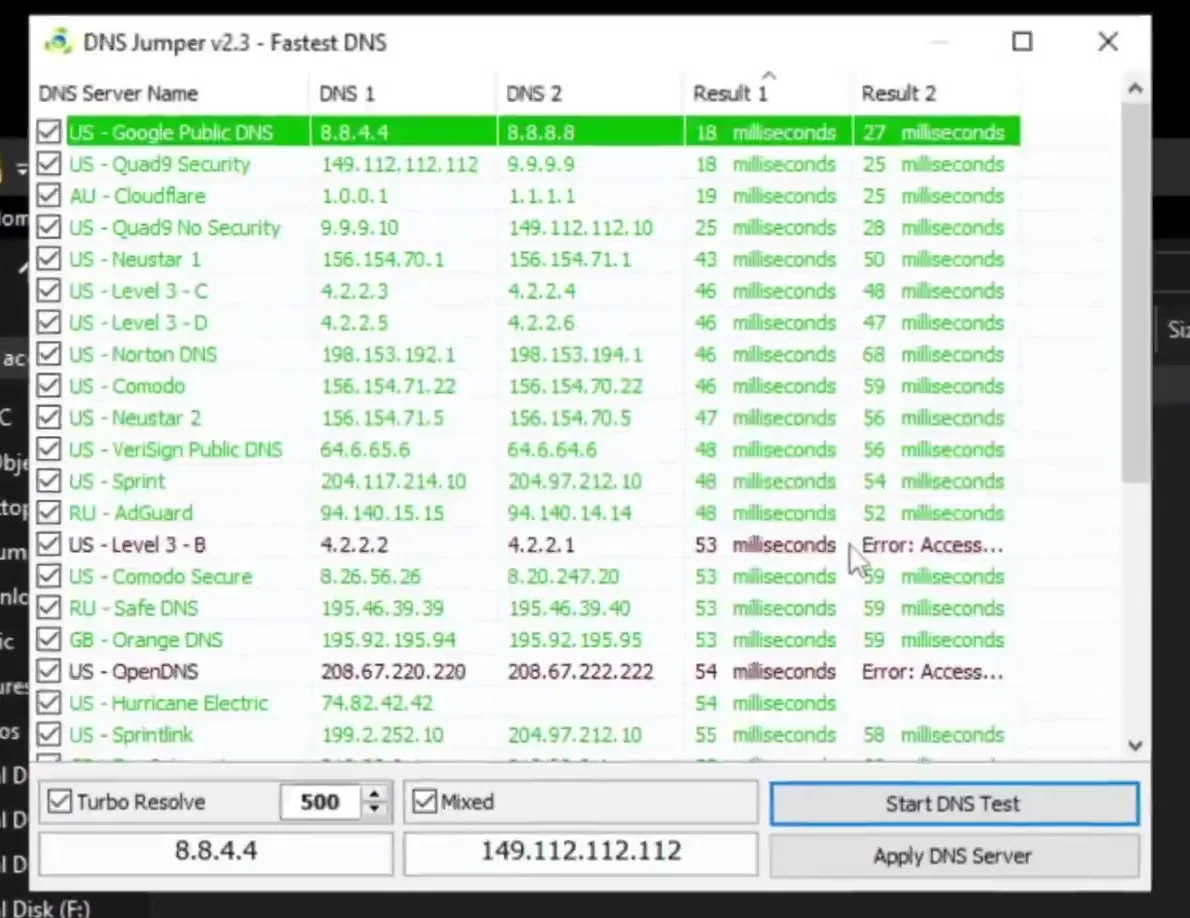
When the test ends, the best server for your connection is selected. Click Apply DNS Server and close everything. On the PC in the video the top row was Google Public DNS at 18 milliseconds, but the winner depends on your location and provider, so run the test on your own PC.
Good to know
A DNS server only speeds up looking up names, such as a game's login servers. It does not change the speed of the match itself, so treat it as one small part of the fix.
Right-click the network icon in the taskbar and open the network settings, then click Change adapter options. Find the adapter you really use. The video uses Ethernet (a Realtek 2.5GbE controller): open it and click Properties.
Network icon (right-click)Change adapter optionsEthernetPropertiesQoS Packet Scheduler
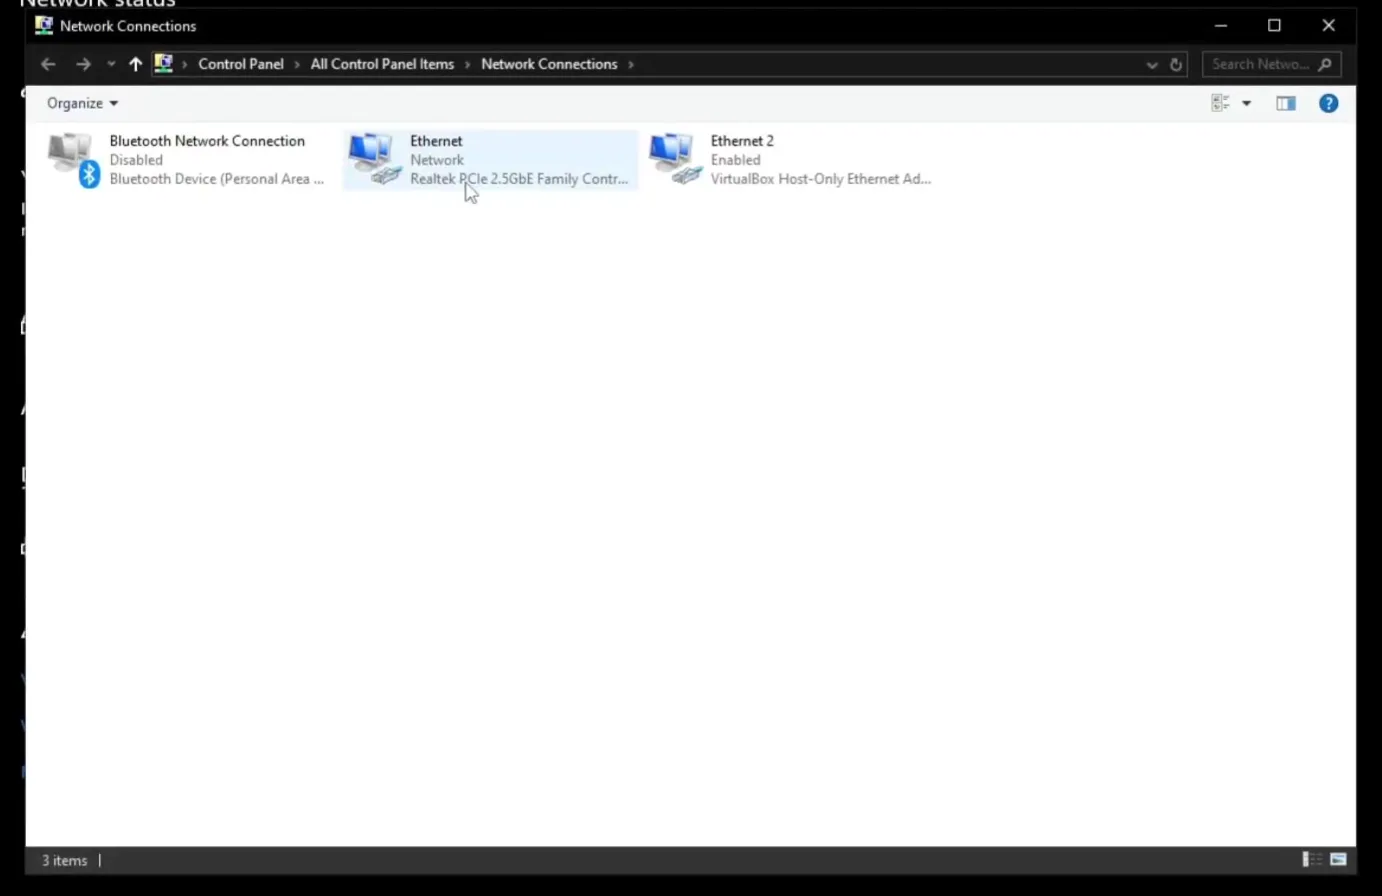
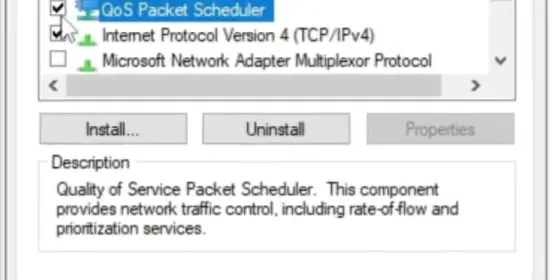
Scroll the list of items to QoS Packet Scheduler and make sure its box is ticked. If it was not, tick it and click OK. If it was already on, close the window: nothing else to do here.
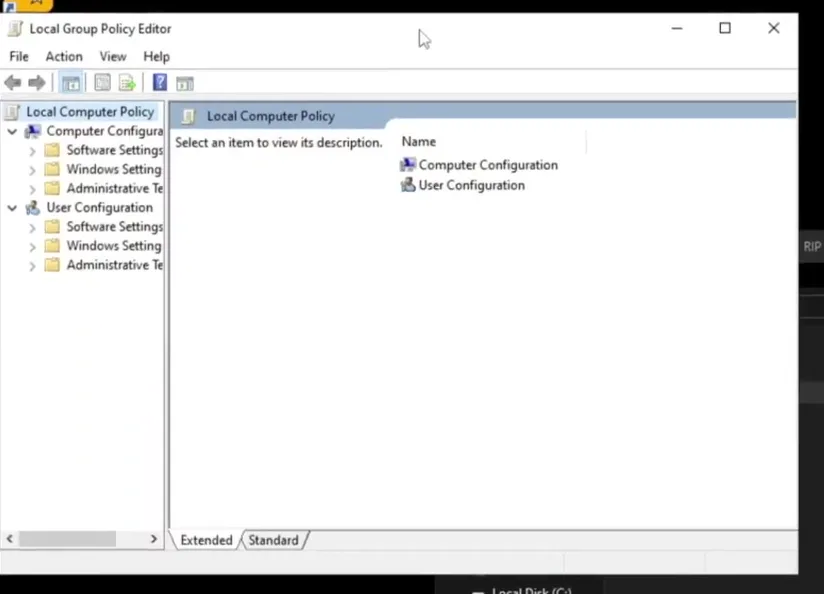
Double-click the gpedit shortcut from the pack. The Local Group Policy Editor opens. Go into Computer Configuration, then Windows Settings, and right-click Policy-based QoS. Click Advanced QoS Settings and open the DSCP Marking Override tab.
gpeditWindows SettingsPolicy-based QoS (right-click)Advanced QoS SettingsDSCP Marking Override
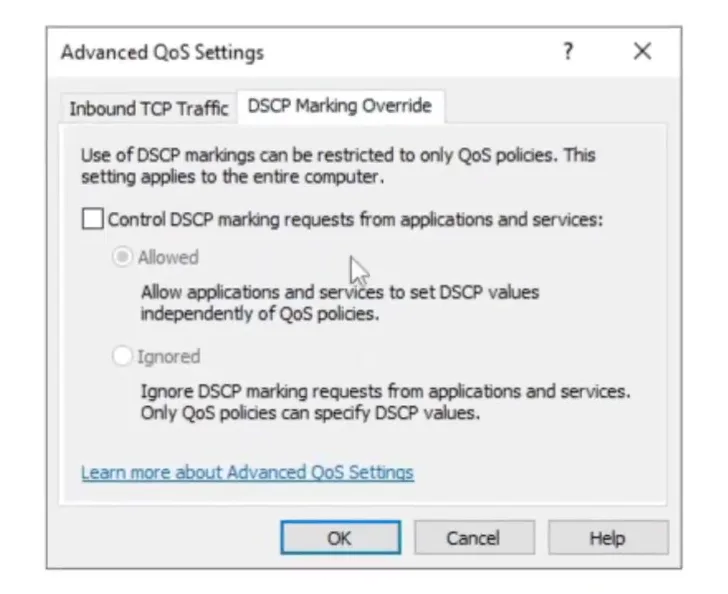
Tick Control DSCP marking requests from applications and services, select Ignored and click OK. Windows describes this as: only QoS policies can set DSCP values. That is what makes the policy in the next step the one that counts.
Still in gpedit, right-click Policy-based QoS again and choose Create new policy. Name it after the game; the video types Fortnite. Keep Specify DSCP Value ticked, type 46 and click Next.
Policy-based QoS (right-click)Create new policyName: FortniteDSCP value 46Next
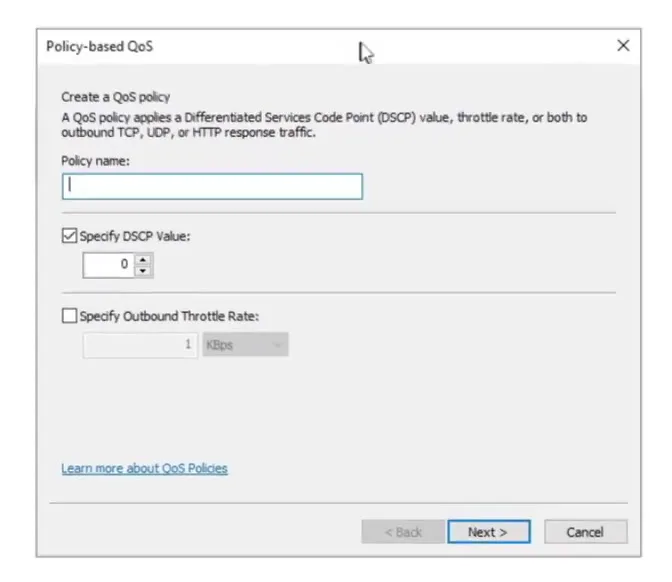
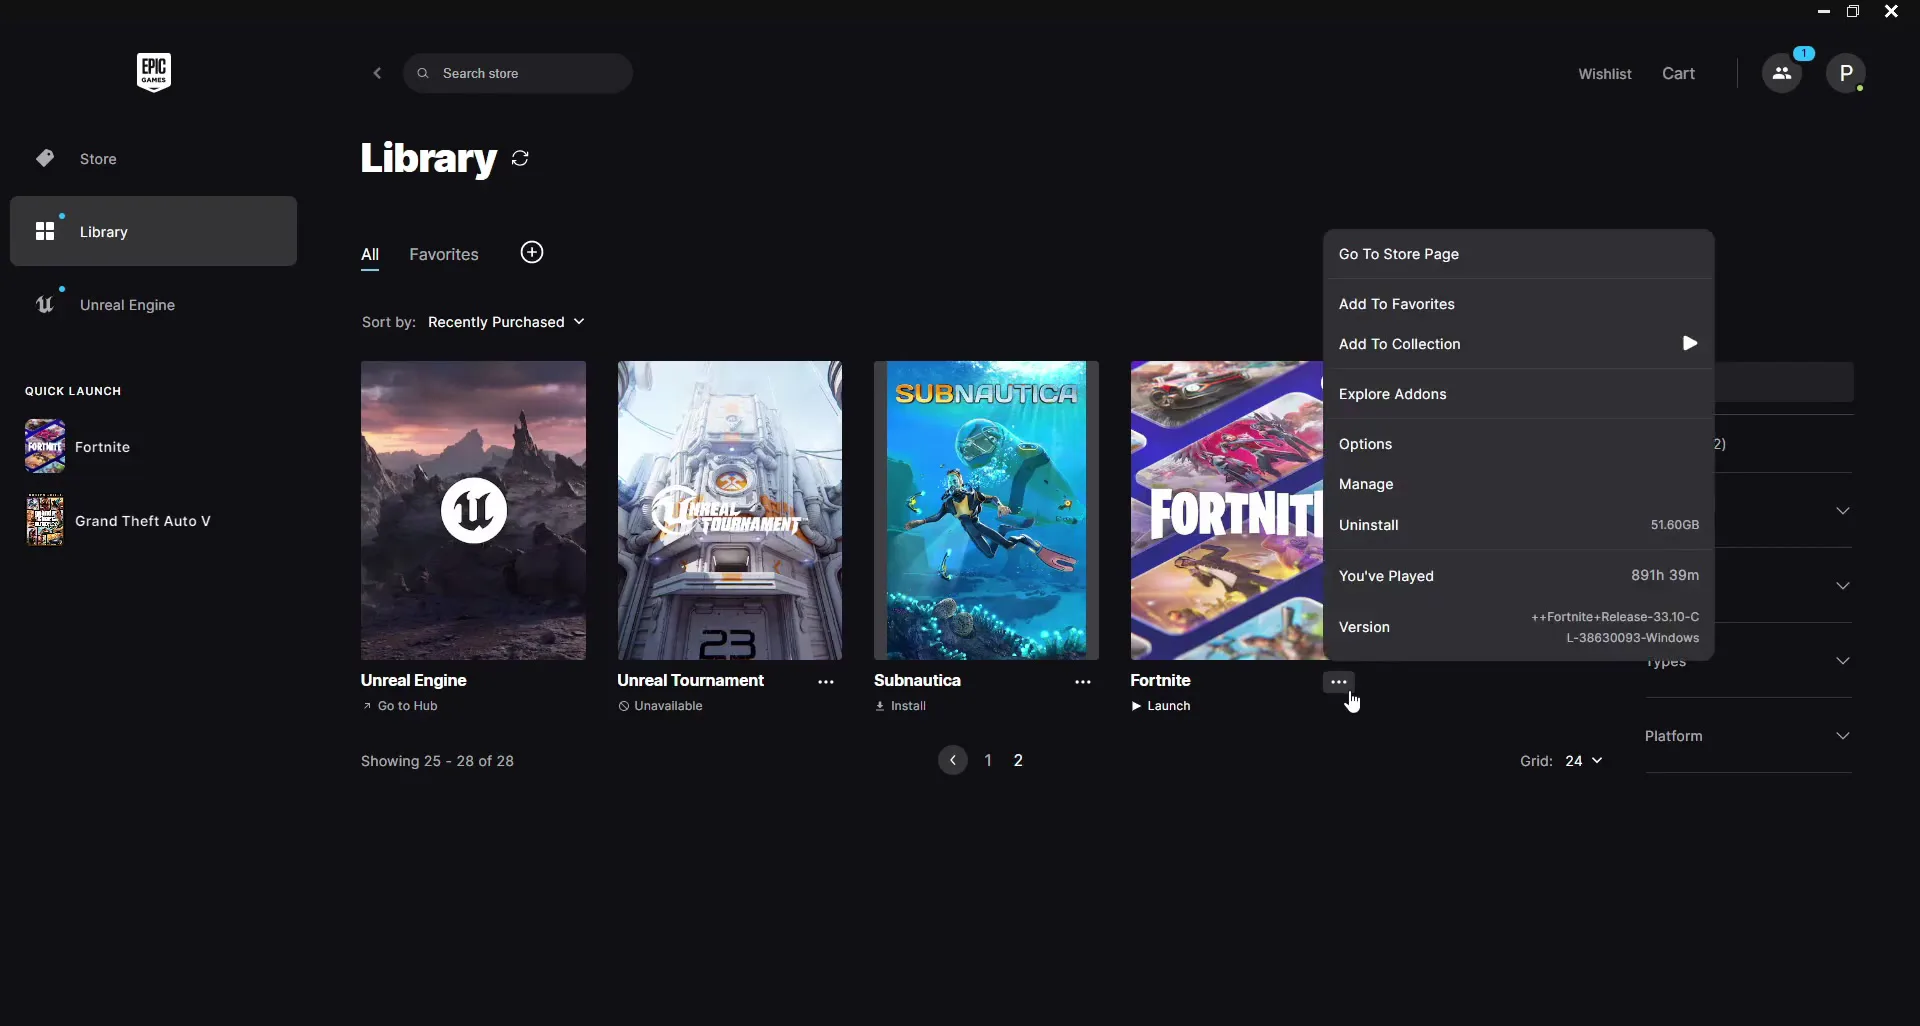
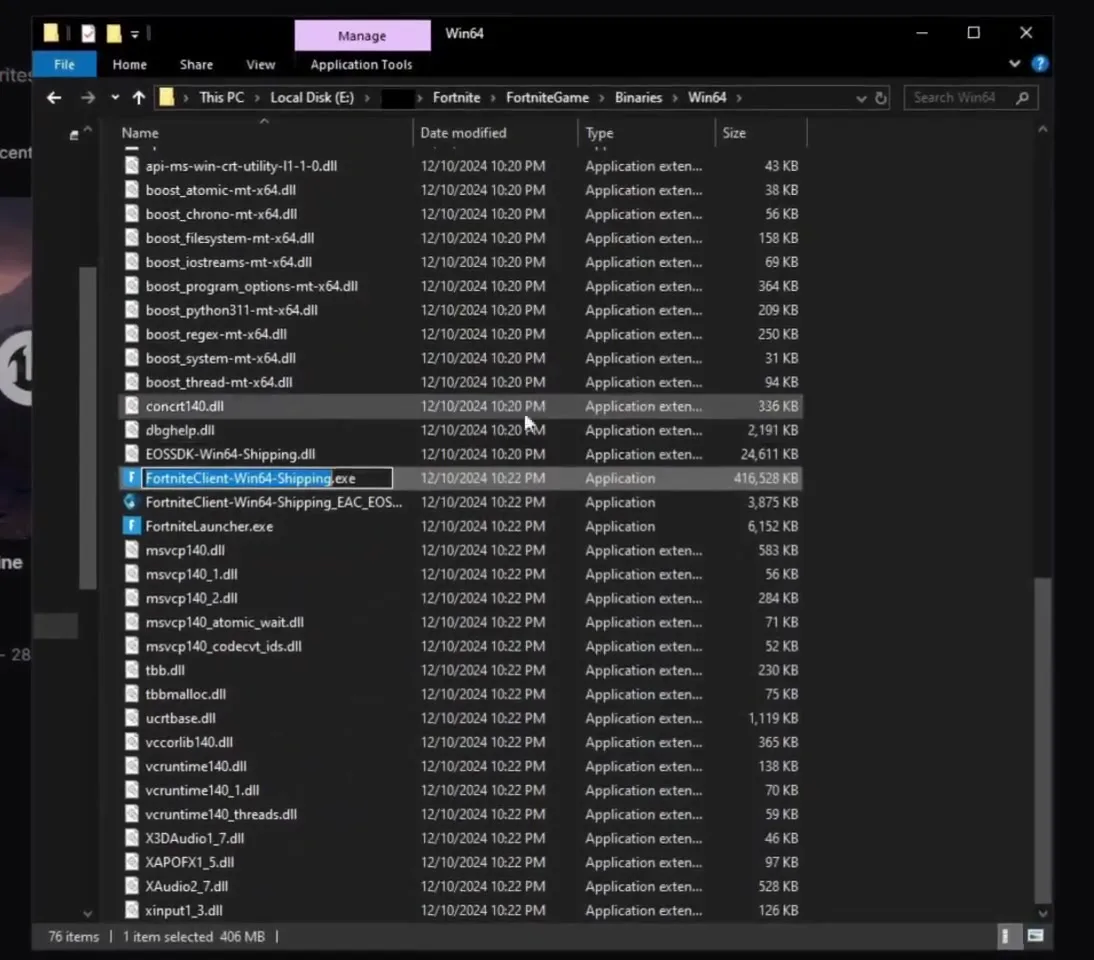
On the next page choose Only applications with this executable name. To get the exact file name, open the Epic Games Launcher, find Fortnite and click the three dots. Click Manage, then open the installation path and go into FortniteGame\Binaries\Win64. Select the file FortniteClient-Win64-Shipping, copy its name, close the folder and Epic, paste the name into the policy and add .exe at the end.
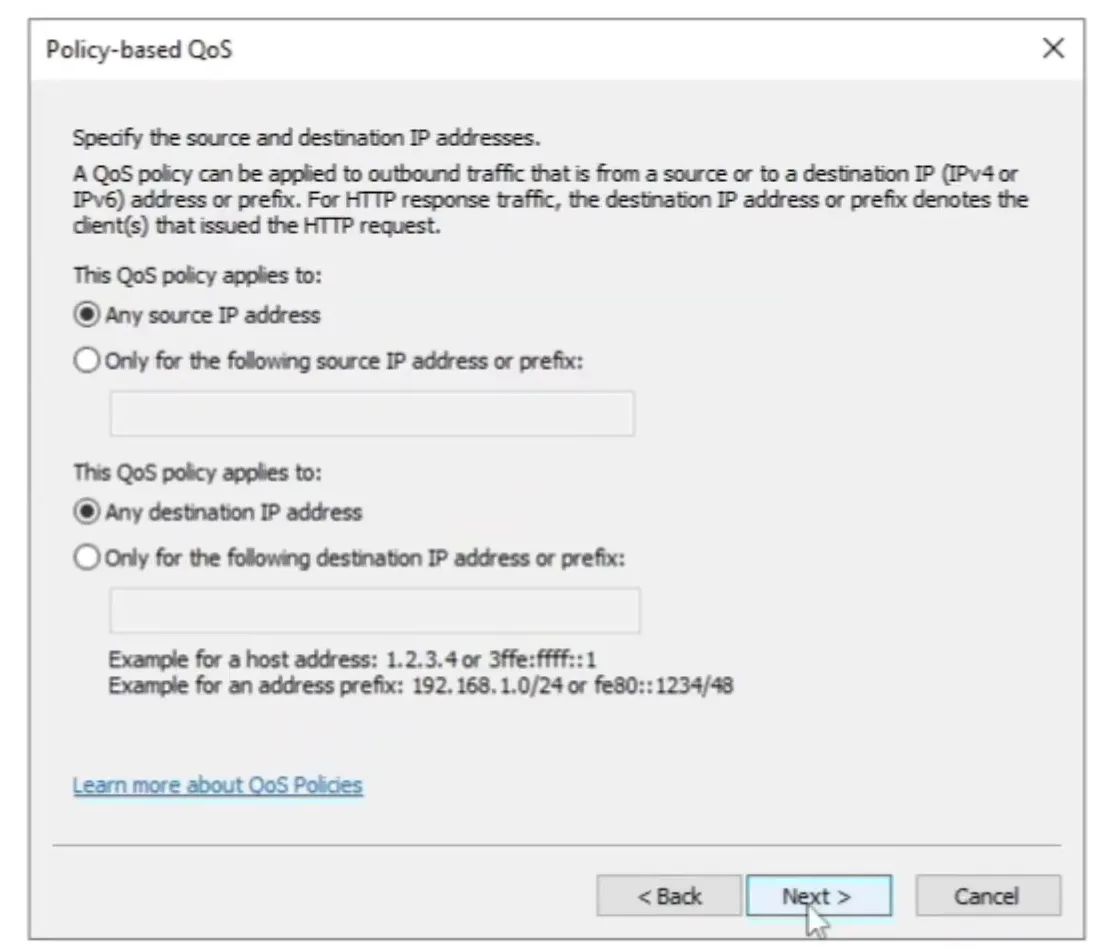
Click Next twice (the source and destination IP pages stay on Any), make sure the protocol is TCP and UDP and click Finish.
Good to know
The policy is tied to one executable. For another game, make a second policy with the same value 46 and that game's own .exe name, which you find the same way in its install folder.
Back in the pack folder, right-click MSI_util_v3.exe and choose Run as administrator. The MSI mode utility lists your devices. Find your internet adapter; on the PC in the video it is the Realtek PCIe 2.5GbE Family Controller, the same adapter as in the QoS step.
MSI_util_v3.exe (Run as administrator)Network adapter rowlimit: 256Apply
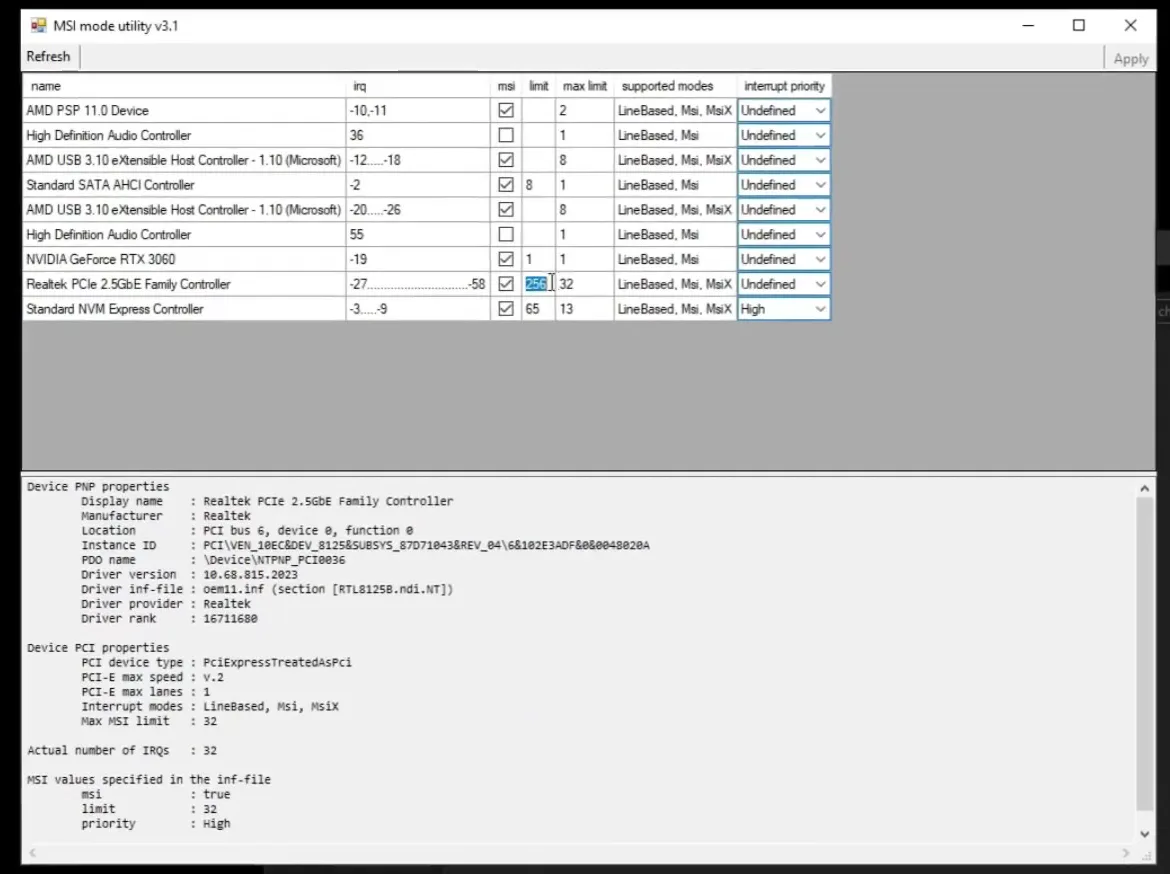
In the limit column of that row, type 256. If it holds anything else, for example 128, replace it with 256. Click Apply and close everything.
Careful
Only touch the row of your network adapter and leave the graphics card, audio and drive rows as they are. Write down the old value of the limit field before you change it, so you can put it back.
For the last step, right-click netrestart.bat and choose Run as administrator. A command window turns your whole network off and back on, so expect your connection to drop for a moment. After that you can start your game.

How to check it worked
Look at the numbers inside the game instead of guessing:
- Turn on the network stats overlay in your game. In Fortnite it shows ping and packet loss, like the overlay in the video. Play a few matches and watch whether the spikes are gone.
- Open DNS Jumper again: the chosen DNS server is shown in its main window and under the adapter's IPv4 properties.
- In the adapter's properties, QoS Packet Scheduler must still be ticked, and in gpedit your policy should be listed with DSCP Value
46and your game's executable.
How to undo it
To go back, delete the policy in gpedit, set DSCP Marking Override back to unchecked, put the old limit value back in the MSI utility, or open the restore point you made in the first step: type restore, open System Restore and pick it.
If the spikes stay, the cause is often outside the PC, such as Wi-Fi or an overloaded router queue. Our bufferbloat guide covers the router side, and the Ethernet versus Wi-Fi extender video guide shows what a cable changes.
Key settings at a glance
FAQ
How do I fix ping spikes and packet loss on Windows?
The video combines six small changes: a faster DNS server, QoS Packet Scheduler on, DSCP Marking Override set to Ignored, a DSCP 46 policy for the game, the adapter limit set to 256 in the MSI utility and a network restart. Set up a restore point first.
What does DSCP 46 do?
DSCP is a priority tag on outgoing network packets, and 46 is the value used in the video for Fortnite. Windows adds the tag only for the game named in the policy. Whether your router or provider acts on that tag differs from network to network, so treat it as something to try and test in your game.
Does this work for games other than Fortnite?
Yes, the steps are the same. Make one policy per game with the value 46 and that game's own executable name, for example the .exe found in its install folder. Only the file name in the policy changes.
Why set DSCP Marking Override to Ignored?
The Windows text under the setting says that, with Ignored, applications and services cannot set their own DSCP values and only QoS policies can. That makes your own policy the only one that decides the value.
Which DNS server should I pick?
The one DNS Jumper finds as fastest for you. It sorts the test results by speed and the video applies the top result. Because it depends on where you live, the winner on your PC can differ from the one in the video.
Is the MSI utility safe to use?
The video changes only the limit value of the network adapter row, to 256. Change nothing else in that list, note the old value so you can restore it, and keep the restore point from the first step.
Why did my connection drop when I ran netrestart?
That is what it is meant to do: the script turns your network off and on again, so the connection is gone for a moment and comes back when it finishes.
Is this guide still current?
The video is from December 2024 and used Windows 10. For the updated app-based version, see our newer ping spikes and packet loss guide.
 RIP Tweaks
Do it in a few minutes with RIP Tweaks
- Free plan for Windows 10 and 11
- A backup first, and every tweak can be switched off again
- Made for higher FPS, lower input lag and steadier ping
Free · Windows 10 and 11
